Category Archives: Home Decor

Hand & Footprint Canvas Craft

Happy Mother’s Day!

This year for our moms, I decided to do a hand made craft with the kids. If you’ve seen my kid crafts before, you know I usually like them to be as adult hands-off as possible. This one is a little different. I saw this awesome idea on Fabulessly Frugal & immediately wanted to do something similar for our moms.

Hand & Footprint Canvas Craft - Mrs. Dessert Monster

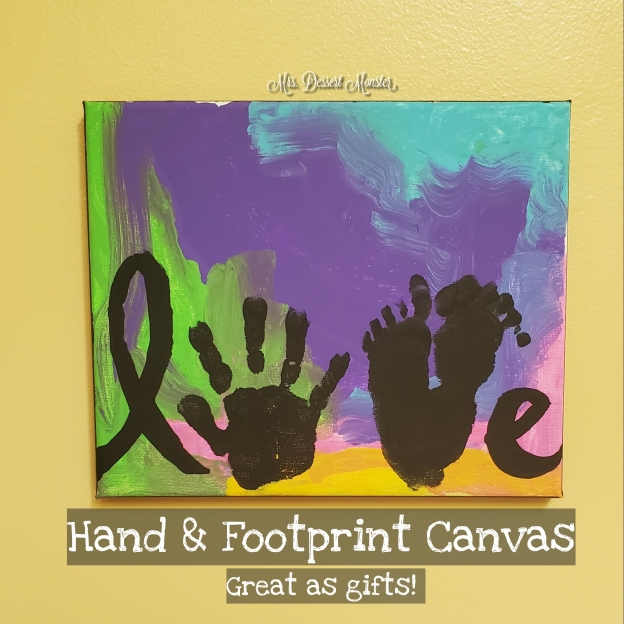
This is a simple, but multi-step (multi-day for me) project. Cupcake is 3 years old & loves painting. I had her paint two canvases; one 8×10 & one 9×11 just to mix it up. She needed a little bit of assistance to cover the entire canvas with paint without leaving white areas or muddling the colors too much. Once that was done, we let the paint dry over night. The next day, we did Cupcake’s hand print as the ‘O’ in LOVE. To be safe & reduce the chance of smudging, we let that dry overnight, too. On a different day, we did Blue’s footprints as the ‘V’. He was 7 months old at a time & it was more difficult than I was expecting! If your child is older, this could be a one day project. Once those dried (I think I did it the same day this time), I painted the ‘L’ & ‘E’. I also painted the edges of the canvas black to make it look more finished. Finally, when everything was dry dry dry, I wrote their names & ages on the back & they were ready to be gifted for Mother’s Day!

Hand & Footprint Canvas Craft - Mrs. Dessert Monster paint

I mailed one to my mom in Florida, & the other we gave to my mother in law Mother’s Day weekend. I love that this is a kid’s craft that also makes for adorable decor. I know the kids will be excited to go to their grandmas’ houses & see their art on the walls. Cupcake will be, anyhow. Blue is still excited about anything & everything, since he is an infant!

Hand & Footprint Canvas Craft

  • canvas, 8×10 or larger (the larger the easier it is to work with)
  • paint, such as acrylic, in as many colors as you’d like plus black
  • paint brushes
  • clean-up supplies such as wipes/towels – especially if there’s a baby involved!
  1. Paint your entire canvas using as many colors as you’d like.
  2. Once your painted canvas is dry, get black paint on your child’s hand. Press their hand on the canvas where the letter O would be in the word LOVE.
  3. Once the hand print is reasonably dry (or totally dry if you are working with toddlers & babies), get black paint on your child’s feet one at a time & press on canvas to form the letter V.
  4. Once the V is reasonably dry, use a brush to paint on the letters L & E. If desired, paint the edges of the canvas black.
  5. Finally, once everything is completely dry, write the child’s name or have them sign the back. Your beautiful art gift is ready!

Fall Pumpkin Toddler Craft

If you’ve seen my post about toddler cards, you know that this mami doesn’t want to put a lot of work into a craft that’s supposed to be done by a toddler. So when I saw a cute little fabric pumpkin at Target I thought to myself, “this would be perfect for Cupcake to decorate – with minimal help from me!”

1538438849123.jpg

I love this project because it is good for almost all toddler development stages & even older! Toddlers (ages 1-3) run the gamut from just starting to walk to almost ready to read, but if your kid can hold a marker, they can decorate a small pumpkin. It doesn’t even have to be a fabric one like this – it can be a craft pumpkin or even a small real one! Just use an appropriate type of marker for whatever the surface of your pumpkin is.

1538437955505.jpg

Cupcake had so much fun coloring all over her pumpkin. She loves when I let her play with markers. She particularly enjoys putting the caps back on.

1538438115193.jpg

You’ll notice I gave her permanent and dry erase markers (which won’t wipe off since this pumpkin’s fabric). Her washable markers are still in some box around here…

The bright side is that her art work is permanent! 😉

The only input I had was giving her the markers one by one & pointing out white places on the pumpkin for her to color on some more. After she was done, I took that permanent marker & wrote her name & the date. Then we went outside for a little photo shoot!

You can kind of see that the leaves are actually changing color around here! Just a few more weeks until cooler temperatures in Georgia. As a Floridian, I am nervous & excited!

This cute little pumpkin is going on our bookshelf. Having just moved, I wasn’t going to pull out much of the fall stuff we have stored in the garage. I’m happy to have a little pumpkin flare around the apartment & it’s extra special that it was made by my daughter.

Fall Pumpkin Toddler Craft

  • small pumpkin (fabric, craft, or real!)
  • markers (I suggest fall colors like green, brown, and orange, but if you want a rainbow pumpkin that sounds fun, too!)
  • adorable toddler
  1. Supervise your toddler while they color on the pumpkin.
  2. When they’re done, write their name on it if you’d like. Done!

Cupcake’s Nursery

When we first moved in to our house, the second bedroom was affectionately called Phase 2. As in the second phase of unpacking/renovating. It remained that way until about my 4th month of pregnancy – 1.5 years later!

That’s when it officially became Cupcake’s nursery.

Ever since completing the nursery & bringing Cupcake home from the hospital, I’ve been meaning to write this post & share it with y’all. So here it is – almost 2 years later, after we moved out of this house.

That’s right, we have left the Sunshine state & moved to the Peach state! We are now officially Atlanta residents (OTP, for those of you in the know). After decades of living in South Florida, we moved north to move to The South.

Before we moved, I was finally able to have the room look organized enough to take photos. What I mean is that her room did NOT look like this on a daily basis – not even close! But I wanted to preserve the memory of her first room in its best state.

20180826_205331.jpg20180826_205310.jpg20180826_205043.jpg1535330705843.jpg20180826_204850.jpg

We decided on teal/aqua, yellow, & pink for her room colors. The color on the wall is Aqua Wish, in case you are wondering!

Cupcake’s favorite corner was this one with her book shelf & glider.

20180826_204931.jpg1535330524297.jpg

How many Usborne & Kane Miller books can you spot?

Here’s a prime example of why I say her room never really looked this organized!

20180826_204947.jpg

This room & this house will always hold a special place in our hearts. It’s the first home Cupcake knew outside my body.

We’re looking forward to decorating her new room in our apartment. And now we have a new ‘Phase 2’ in the 3rd bedroom!


‘It’s A Wonderful Life’ Housewarming Gift

When we first bought our house, our friends Beth & David gave us the housewarming gift made famous by ‘It’s A Wonderful Life’.

wpid-1431955949625.jpg

Last summer our dear friends moved away & now they have a home of their own in Delaware. I wanted to be able to give them the same great housewarming gift, but the distance forced me to get creative.

I decided to make them a canvas wall hanging.

20171118_204405.jpg

I printed the text on some pretty craft paper, painted the elements (& the edge of the canvas) with acrylic paint, outlined them in permanent marker, & sprayed the whole thing with an acrylic sealer.

1511055544786.jpg

It was a fun project! It took me several days – probably would’ve only taken me 2 or 3 in my pre-baby days, haha.

Once Beth & David were settled in their new home, I shipped it off to them.

1511056885873.jpg

Though I miss them dearly, I am so happy for their new adventure.

Can’t wait to visit them in January – wish us warm-blooded Floridians luck!

Photo Clothesline Cubicle Decor

I recently changed jobs in my company & along with the new responsibilities (& way less stress!) came a new cubicle.

I’ve always been a big proponent of personalizing my workspace & having lots of pictures around me, but with this new space I wanted it to be a little nicer than my previous one. So instead of just taping some photos to the wall in a collage or something, I was inspired by the ‘photo clothesline’ trend on Pinterest.

wp-1456627920493.jpg

This was so easy to do! All I used was twine, mini clothespins, & thumbtacks.

wp-1456627938570.jpg

I tied the twine around two thumbtacks securely & then pushed them into my cubicle wall. If you can’t do that, then I’m sure a nail or something would work just as well.

wp-1456627914932.jpg

The pictures & clothespins are going to weigh down the twine, so you don’t really want to leave slack when you’re pinning up the twine, but you don’t want to make it too taught. Play around with the placement & see what looks best to you.

wp-1456627927934.jpg

I absolutely LOVE the way it turned out. It makes my workspace feel more homey & makes coming to work all the more bearable enjoyable!

wp-1456765857830.jpg

Flowers from my hubby help, too ❤


Is your workspace decorated?

Easy Thanksgiving Decorations

Tomorrow is the day that lots of us have been looking forward to!

My husband & I have been shopping, cleaning, & even started prepping some of the food for our first Thanksgiving hosted in our new house.

My mom has passed on her Thanksgiving serveware & tablecloths to me, but as far as decorations I was on my own.

Thankfully, I’m a crafty girl.

wp-1448423120212.jpg

It took me like 10 minutes to make 4 of these floral decorations.

wp-1448423132519.jpg

I had some empty bottles *cough cough Red Stripe beer bottles* around & picked up some fake flowers at the Dollar Store. The burlap I had in my craft supplies.

wp-1448423124667.jpg

Voila!

These will just add an extra little something special to tomorrow’s festivities.

wp-1448423128576.jpg

Happy Thanksgiving, Y’all!

Wedding Shadow Box

A few weekends ago I finally got around to making the last of my post-wedding crafts.

Shortly after our wedding last December, I bought a shadow box for wedding memories. I knew I wanted to display our guest book records along with it – more on that later.

Wedding Shadow Box - Mrs. Dessert Monster

So, I got to work on my shadow box on this free Saturday I had. It was a wonderful Saturday, one that had absolutely no plans or schedules. My husband & I got to stay home all day. We did some stuff around the house. I did some crafty things. We watched college football. We grilled up some steaks for dinner. I baked brownies for dessert. It was very relaxing & much needed.

I had been saving extras of all of my wedding stationery, ornament favors, & cake decorations for this shadow box. I also saved my bouquet – no fancy preservation or anything. My mom grabbed it for me the day of the wedding & it has been sitting in a mason jar on my vanity for months, drying nicely.

Wedding Shadow Box - Mrs. Dessert Monster

Obviously it isn’t as bright & vibrant as when the flowers were alive, but it still looked pretty good.

Red Bouquet - Mrs. Dessert Monster

I didn’t want to use the entire bouquet, just one or two of each flower. So I disassembled the bouquet & made my own little mini arrangement before using the original ribbon to wrap it up.

Wedding Shadow Box - Mrs. Dessert Monster

Stanley kitty was hanging out with me while I assembled everything.

Wedding Shadow Box - Mrs. Dessert Monster

I love how it turned out!

Guest Bathroom Remodel – In Yellow!

My husband & I bought our first home a little over 3 months ago.

We were very fortunate to find a house in good condition. The house did not need any major work – it just needed to be updated/customized to our liking.

It’s a pretty typical house for our area – 1970’s construction – that came complete with 70’s style bathrooms.

If you don’t know what I mean, let me just show you the before picture of the guest bathroom…

Guest Bathroom Remodel - Mrs. Dessert Monster

Yep. It’s blurry, but your eyes are not deceiving you.

Here are some close ups.

Guest Bathroom Remodel - Mrs. Dessert MonsterGuest Bathroom Remodel - Mrs. Dessert Monster

You can see why we had to remodel this bathroom immediately.

Apparently in the 70’s in South Florida, bathrooms came in funky patterns & 3 colors: mustard yellow, light blue, & pink. Our master bathroom is light blue – we can live with that for now.

There was just one issue my husband & I had when deciding what to do about this bathroom: money. We had a couple of other projects going on & didn’t want to spend a whole lot on this bathroom. Plus, the previous owner had replaced the toilets in both bathrooms before selling the house.

Yes, that’s right, the toilet in the pictures is brand new. The previous owner special ordered a new mustard yellow toilet. Bless his heart.

I was not about to get rid of a brand new toilet. I knew there was some way I could work around this.

I also knew I couldn’t be the only one with this problem, seeing as how this really was a popular bathroom color back in the day. I started searching online for inspiration. In my searching, I came across this post from Remodelaholic. They did a GREAT job on that bathroom! I loved the idea of embracing the yellow & using it as an accent color with some molding across the wall.

Our bathroom didn’t need quite as much work as they put in to theirs. We just had to demo ours a little bit first. That was the fun part!

Guest Bathroom Remodel - Mrs. Dessert Monster

Our friend lent us some demolition tools that made it really fun!

We removed the tile floor, sink & vanity, mirror, light fixture, towel bars, & toilet paper holder. We also removed the sliding glass doors from the tub. One thing we did not mean to remove was the shower tiles – but when we were removing the doors they all started coming down from both sides.

Guest Bathroom Remodel - Mrs. Dessert Monster

Oops.

Luckily, we were able to salvage them & reattach.

Once everything was removed, the bathroom looked pretty rough.

Guest Bathroom Remodel - Mrs. Dessert Monster

Before we did anything else, we laid new tile. My husband & I fell in love with the tile that looks like wood. The bathroom isn’t very big, so a couple of boxes of tile from Home Depot did the trick. My husband became well acquainted with the tile saw we rented. Instead of removing the toilet we tiled around it, which meant he had to cut some interesting pieces. He handled it like a pro!

Guest Bathroom Remodel - Mrs. Dessert Monster

Before the grout.

I love how it turned out! My mother in law helped us out by grouting the floor & shower tiles. I repaid her in shrimp & grits. 🙂

As you can see in the demo pics, there were some holes in the walls after we took everything down. The walls in this house are plastered – another 70s trend apparently. It actually helped us out, though. After using a couple of drywall patches & spackle, the walls look good as new (in a DIY home improvement sort of way)!

Once the spackle was dry & sanded, we painted. Using the top of the shower tiles as a reference to where we wanted the molding to go, we drew a line with pencil & painted the top of the wall a bright yellow. I had found a shower curtain at Target with an ombre floral pattern – so I wasn’t too concerned with the different shades of yellow, knowing that the shower curtain was going to tie everything together. We painted the rest of the wall white, & once everything was dry we put up the molding with some adhesive.

Then came my husband’s time to shine. He installed the vanity & sink, the medicine cabinet, & the light fixture. I am so blessed to have married such a handy guy!

Guest Bathroom Remodel - Mrs. Dessert Monster

We decided on oil-rubbed bronze fixtures. When I first saw that you could replace your toilet handle, I thought it was a bit silly. But after we had installed everything & put up the new towel hooks, the silver colored handle stood out like a sore thumb…

Guest Bathroom Remodel - Mrs. Dessert Monster

It cost $14 – money well spent!

I didn’t bother with the shower fixtures, though. They are behind the curtain!

The only thing left for me to do was decorate.

We had these two canvases up at our last place that ended up matching perfectly in this bathroom!

Guest Bathroom Remodel - Mrs. Dessert Monster

The other wall originally had these two old-timey borderline-creepy pictures. Like the kind of pictures that, if this was a horror movie, would move when you weren’t looking. So I discarded the pictures, kept the frames, & made my own bible verse prints.

Guest Bathroom Remodel - Mrs. Dessert Monster

Guest Bathroom Remodel - Mrs. Dessert Monster

Voila! The bathroom is complete.

Guest Bathroom Remodel - Mrs. Dessert Monster

Gotta love the panoramic mode on my camera!

All in all, we completed this bathroom in about 3-4 days with about $400. I think it’s the room I’m most proud of when you consider the before & after.

Guest Bathroom Remodel - Mrs. Dessert Monster

Guest Bathroom Remodel - Mrs. Dessert Monster

It was a good bit of work, but now I know that my hubby & I can handle home improvement projects together. I love the yellow & oil-rubbed bronze combo!

Someday we might replace the tub & toilet, but for now I’m very pleased with how we were able to work around it!

In The New House Designs

Our TV Wall

My husband is a very techy guy. He works in IT, & just has a way with electronics. I’m convinced he has some sort of electromagnetic field around him, because he can fix most electronics by just touching them. There have been times where my phone is acting up & I’ll call out for my husband. By the time he gets up from his chair, my phone is working. It’s like even just the threat of him touching it is enough to fix it. Don’t make me come over there!

When I told him I wanted to hang our TV & put shelves up around it, he was totally in to it!

TV Wall - Mrs. Dessert Monster

We hung the TV (48″) in the direct center of the wall, then planned where we wanted the shelves.

We had never really hung shelves like this before. It was a slight pain to get them all even, but we did it! My biggest recommendation to anyone hanging shelves with visible brackets like this is to hang the brackets on the wall first, then put the shelves on top & screw them in. Also, if you don’t have an electric/battery operated drill, get one!

Besides being tech savvy, my husband is also very handy. He’s the best. 🙂

Concealing all of the wires for the surround sound & everything took some planning on our part, but we did it!

TV Wall - Mrs. Dessert Monster

Here’s our secret: We took a vinyl basket & cut the back off of it. The surge protector & all the wires go inside. Tada!

For the wires we couldn’t conceal as easily, we used racetrack.

wpid-1435798163891.jpg

That’s an antenna. We ditched our cable bill a while ago. Netflix & HBO Go, baby!

You’ll also notice that we display plenty of love for our alma maters, with these signs & our bookends holding the DVDs.

Another little trick I’m proud of is using a desk organizer as a remote caddy.

TV Wall - Mrs. Dessert Monster

I love this whole shelf thing because of the holiday/ special occasion decorating potential. I can’t wait to decorate these for Christmas!

TV Wall - Mrs. Dessert Monster
In The New House Designs

DIY Bookends

One of the major projects we did in our house was a TV Wall. Instead of an entertainment center, we put up shelves. Which means that instead of a DVD rack, we have shelves. Which means that to put up our DVDs, I needed bookends.

You can see where this is going.

I tried to find cute ones online, but I was not satisfied with any of the ones I was seeing. So I decided to make my own!

DIY Bookends Bull & Gator - Mrs. Dessert Monster

You may be wondering, “what’s up with the bull & the alligator?”

My husband is an alumnus of USF, home of the Bulls. I am an alumna of UF, home of the Gators.

Thank you, Gilmore Girls, for teaching me the proper singular forms of the word alumnus. Yes, that is all 7 seasons of Gilmore Girls on the shelf.

So, these bookends are a subtle tribute to our alma maters. They were also really easy to make!

DIY Bookends Bull & Gator - Mrs. Dessert Monster

I bought the bull & gator on Amazon & the birch bases at Michael’s. I had this adhesive for other home projects, & it was perfect for this one since it dries clear! You can probably use one of several other types of adhesives, but this is what I had around the house & it did the trick.

DIY Bookends Bull & Gator - Mrs. Dessert Monster

This adhesive also takes 24 hours to set, which is great because I totally moved the Gator around several times before I found the best spot for it.

DIY Bookends Bull & Gator - Mrs. Dessert Monster

See, totally clear! The whole picture is clearer. The adhesive didn’t have anything to do with that, but still! Clear.

Umm, that’s it.

That’s how easy these were to make.

DIY Bookends Bull & Gator - Mrs. Dessert MonsterDIY Bookends Bull & Gator - Mrs. Dessert MonsterGo ahead, judge our collection. I think it’s pretty sweet, especially now that it’s up with these awesome bookends!

In The New House Designs