Category Archives: Pregnancy & Parenting

Hand & Footprint Canvas Craft

Happy Mother’s Day!

This year for our moms, I decided to do a hand made craft with the kids. If you’ve seen my kid crafts before, you know I usually like them to be as adult hands-off as possible. This one is a little different. I saw this awesome idea on Fabulessly Frugal & immediately wanted to do something similar for our moms.

Hand & Footprint Canvas Craft - Mrs. Dessert Monster

This is a simple, but multi-step (multi-day for me) project. Cupcake is 3 years old & loves painting. I had her paint two canvases; one 8×10 & one 9×11 just to mix it up. She needed a little bit of assistance to cover the entire canvas with paint without leaving white areas or muddling the colors too much. Once that was done, we let the paint dry over night. The next day, we did Cupcake’s hand print as the ‘O’ in LOVE. To be safe & reduce the chance of smudging, we let that dry overnight, too. On a different day, we did Blue’s footprints as the ‘V’. He was 7 months old at a time & it was more difficult than I was expecting! If your child is older, this could be a one day project. Once those dried (I think I did it the same day this time), I painted the ‘L’ & ‘E’. I also painted the edges of the canvas black to make it look more finished. Finally, when everything was dry dry dry, I wrote their names & ages on the back & they were ready to be gifted for Mother’s Day!

Hand & Footprint Canvas Craft - Mrs. Dessert Monster paint

I mailed one to my mom in Florida, & the other we gave to my mother in law Mother’s Day weekend. I love that this is a kid’s craft that also makes for adorable decor. I know the kids will be excited to go to their grandmas’ houses & see their art on the walls. Cupcake will be, anyhow. Blue is still excited about anything & everything, since he is an infant!

Hand & Footprint Canvas Craft

  • canvas, 8×10 or larger (the larger the easier it is to work with)
  • paint, such as acrylic, in as many colors as you’d like plus black
  • paint brushes
  • clean-up supplies such as wipes/towels – especially if there’s a baby involved!
  1. Paint your entire canvas using as many colors as you’d like.
  2. Once your painted canvas is dry, get black paint on your child’s hand. Press their hand on the canvas where the letter O would be in the word LOVE.
  3. Once the hand print is reasonably dry (or totally dry if you are working with toddlers & babies), get black paint on your child’s feet one at a time & press on canvas to form the letter V.
  4. Once the V is reasonably dry, use a brush to paint on the letters L & E. If desired, paint the edges of the canvas black.
  5. Finally, once everything is completely dry, write the child’s name or have them sign the back. Your beautiful art gift is ready!

Banana Chocolate Chip Lactation Muffins

It has taken me a while, but I have finally come around to sharing recipes on this blog that I make all the time. One of those, in my breastfeeding seasons of life, is this lactation muffin.

Banana Chocolate Chip Lactation Muffins - Mrs. Dessert Monster

This recipe has the big 3 galactagogues: oats, flax, & brewer’s yeast. My issue with other lactation muffin recipes out there is that they try so hard to mask the bitter brewer’s yeast flavor that they barely add any, or add loads of sugar, or sometimes both! This recipe, in my completely biased opinion, is the perfect balance between a sugary,  almost-cupcake & a bitter, too-healthy muffin. It is even vegan if you use vegan chocolate! I have not tried it with whole wheat flour, yet. When I do I will update! Update: whole wheat, white whole wheat, or just plain old all purpose flour all work great!

Banana Chocolate Chip Lactation Muffins - Mrs. Dessert Monster

These muffins are sweet but not too sweet. You can taste that there’s something different about them compared to ‘regular’ banana bread muffins – that’s the brewer’s yeast. If you *really* don’t like the taste, dial it back to 2 tbsp instead of 4 (1/4 cup = 4 tbsp). Flax & brewer’s yeast are very nutritious whether you are breastfeeding or not, so this is a great recipe to share with the whole family.

These muffins freeze very well, just individually wrap them. To thaw, unwrap & microwave for 30 seconds from frozen to enjoy warm. My personal favorite way to enjoy these muffins is with a schmear of sweetened cream cheese.

Banana Chocolate Chip Lactation Muffins

Makes 12 muffins
  • 3 very ripe bananas
  • 1/3 cup coconut oil, melted 
  • 1 tsp vanilla
  • 1/2 cup sugar
  • 1 cup of flour (whole wheat or all-purpose)
  • 1/2 cup of rolled oats
  • 1/4 cup brewer’s yeast
  • 1/4 cup ground flax seed
  • 1 tsp baking soda
  • pinch of salt
  • 3/4 cup chocolate chips (use vegan chips for vegan option)
  1. Preheat oven to 350. Prepare your muffin pan with either liners or baking spray.
  2. Microwave bananas for about 30 seconds so they are ultra mushy.
  3. In the bowl of your stand mixer, add bananas, coconut oil, & vanilla. Mix on medium low until well blended. (It’s ok to see small chunks of coconut oil that have solidified.)
  4. Add sugar and mix on medium until combined.
  5. In a separate bowl, mix flour, baking soda, salt, oats, brewer’s yeast, & flax.
  6. Add the dry mixture to the banana mixture & mix on medium until well combined.  Then add chocolate chips and mix just until the chips are evenly distributed.
  7. Divide the batter into your prepared muffin pan. You should get 12 muffins.
  8. Bake 25-30 minutes or until they pass the toothpick test.
  9. To freeze: completely cool muffins. Wrap each muffin individually in plastic wrap & then place in a plastic container or plastic bag.

Nutritional info: 262 cal, 35.7 g carbs, 11.5 g fat, 4.5 g protein

Baby Boy Blueberry is here!

Baby Boy Blueberry was born one day before his due date a few weeks ago!

I won’t go in to his full birth story, but I will share with you that I had a successful VBAC! Labor was really really long, which makes sense when you think that even though he’s my second baby my body had never done all the things it had to do before. Cupcake was delivered via c-section before I ever dilated or had too many real contraction.

1570114929187.jpg

All of the hard work was totally worth it.

1570113914251.jpg

My husband was amazing the entire time. He always is, but I got to see a whole new super hero side of him. He was the first to hold our son – he caught the baby! It was an amazing delivery in the end.

1570114163169.jpg

I cannot express in words how invaluable my doula was. Even if you have given birth before, I still definitely recommend a doula. It is so wonderful to have a knowledgeable third party looking out for you in the hospital. My husband was able to focus on comforting me while my doula gave him tips, listened out for what the nurses and doctors were telling me, helped me understand what was going on with my body, and ultimately cheered me on and helped me emotionally.

1570115206160.jpg

Cupcake is so smitten with her little brother. Of course, she’s being a total toddler with Mami and Daddy, but when it comes to her baby she’s being a total angel.

1570115086241.jpg

We are so grateful to God for these blessings ❤

Due Date Cookies

I am doing everything in my power to get baby boy Blueberry out in a natural way. One of the things I’m doing is eating 6 dates a day. According to studies, women who eat 75 grams of dates (approximately 6 deglet noor dates, or 3-4 medjool dates) a day for the last month of pregnancy have shorter & easier labors. Dates are also packed with nutrients like potassium and magnesium which help with with swelling and blood pressure. You can read all that Mama Natural has to say about them here.

The only problem is that I am not a fan of the taste of a plain date. Therefore I have been finding creative ways to get them in without just forcing myself to eat them. I’ve been putting them in smoothies, eating Larabars, making them into peanut butter balls, and baking these cookies. I found this recipe and tweaked it to make it more date-y and also a little more simple for the 9 months pregnant mama. There’s no waiting or chilling in my recipe – just whip up & bake!

Due Date Cookies - Mrs. Dessert Monster

Cupcake loves making these cookies with me, or as she says it “mixa con Mami”. I love toddler speak! She really enjoys eating these cookies, too. My husband said they were ‘good, not great’. He’s more of a chocolate chip guy. I told them they weren’t for him – they were for me and the baby!

Due Date Cookies - Mrs. Dessert Monster

Dates and walnuts go really well together, but I have also made these with a mix of walnuts, almonds, and pecans. You can’t go wrong with any or all of those nuts.

Due Date Cookies - Mrs. Dessert Monster

This recipe contains 24 dates and makes 24 cookies. Therefore with this recipe you can be saying 6 cookies a day instead of dates!

Please say a prayer for me as I approach delivery day!

Due Date Cookies

  • 24 pitted deglet noor dates (or 12-15 medjool)
  • 1 cup walnuts (or your favorite nut)
  • 1/2 cup room temperature butter (1 stick)
  • 3/4 cup sugar
  • 1 egg
  • 1/2 tsp vanilla
  • 1 1/2 cups flour
  • 1/2 tsp baking soda
  • 1/2 tsp salt
  1. Preheat oven to 350. Using a food processor, chop the dates and walnuts together until they are broken up into very small pieces – a little bigger than a coarse meal. Alternatively, chop by hand to desired size. Set aside.
  2. Cream together the butter and sugar using stand or electric mixer.
  3. Add the egg & beat until incorporated. Then add vanilla.
  4. Mix in dry ingredients on low. When fully incorporated, add date/walnut mixture.
  5. Scoop 24 cookies onto parchment paper lined cookie sheets. Bake for 11-12 minutes, until bottoms just start to brown. Cool on cookie sheets for 5 minutes before transferring to cool completely. Enjoy!

Cupcake’s Nursery

When we first moved in to our house, the second bedroom was affectionately called Phase 2. As in the second phase of unpacking/renovating. It remained that way until about my 4th month of pregnancy – 1.5 years later!

That’s when it officially became Cupcake’s nursery.

Ever since completing the nursery & bringing Cupcake home from the hospital, I’ve been meaning to write this post & share it with y’all. So here it is – almost 2 years later, after we moved out of this house.

That’s right, we have left the Sunshine state & moved to the Peach state! We are now officially Atlanta residents (OTP, for those of you in the know). After decades of living in South Florida, we moved north to move to The South.

Before we moved, I was finally able to have the room look organized enough to take photos. What I mean is that her room did NOT look like this on a daily basis – not even close! But I wanted to preserve the memory of her first room in its best state.

20180826_205331.jpg20180826_205310.jpg20180826_205043.jpg1535330705843.jpg20180826_204850.jpg

We decided on teal/aqua, yellow, & pink for her room colors. The color on the wall is Aqua Wish, in case you are wondering!

Cupcake’s favorite corner was this one with her book shelf & glider.

20180826_204931.jpg1535330524297.jpg

How many Usborne & Kane Miller books can you spot?

Here’s a prime example of why I say her room never really looked this organized!

20180826_204947.jpg

This room & this house will always hold a special place in our hearts. It’s the first home Cupcake knew outside my body.

We’re looking forward to decorating her new room in our apartment. And now we have a new ‘Phase 2’ in the 3rd bedroom!


Toddler Cards For Any Occasion

Cupcake’s birthday is in January, so last year she got to enjoy all of her first holidays in order. This means that I got to do all of the fun handprint/footprint crafts for with her.

Footprint Valentines day heart? check. Footprint Father’s day craft? check. Handprint turkey for Thanksgiving? check. Handprint AND footprint clay ornaments for Christmas? check.

Now that she’s no longer an infant, I just don’t find it as cute. Let’s face it – the gift recipients know who really made those things. ME. Don’t get me wrong, there are some really cute ideas on Pinterest. But most of them are just work for mom.

Cupcake is 17 months old – old enough to want to do things on her own, but not old enough to really understand that we are making a gift for someone else. So even if I wanted to, it’d be pretty challenging to get her to give me a handprint or a footprint this year. So strong willed, & she’s not even 2! Say a prayer for me.

For Father’s day I searched for ideas of something she could make her daddy that was minimal work for me while being a little more thoughtful than just her scribbling on a piece of paper. I didn’t really come across any ideas I liked, but inspiration came from Cupcake herself. She likes to color & paint all by herself (heavily supervised, of course!) & her absolute favorite thing in the world right now is stickers. That gave me an idea.

It sounded too simple, but what if Cupcake really could make a card for daddy by herself with minimal guidance from me?

Toddler Cards for Any Occasion Made By Toddlers - Mrs. Dessert Monster

Sometimes, the K.I.S.S. principle really is the best. Keep it simple, silly!

Cupcake had a lot of fun painting this card for daddy.Toddler Cards for Any Occasion Made By Toddlers - Mrs. Dessert Monster

Once the paint was dry, we added stickers. I let her add as many hearts as she wanted before giving her the sticker letters, one at a time in order, to spell DADA. That’s really all of the involvement I had, minus making sure she didn’t get paint everywhere! Oh, and writing her name & the date on the back!

This craft is so easily adaptable for any occasion! Use different colored paper, paint, or markers depending on your target audience & time of year! It’s infinitely customizable. You can let your toddler add as much or as little embellishment as you wish. The only ‘must’ is sticker letters. As long as your toddler has the motor skills to put stickers on a paper, they can do this craft!

Toddler Cards for Any Occasion Made By Toddlers - Mrs. Dessert Monster

My hubby really loved receiving this card from our sweet daughter. She handed it to him herself! It might sound silly, but the fact that he can tell she really made it (as opposed to mommy) makes it more special!

Toddler Cards For Any Occasion

  • card stock – any color!
  • paint, crayons, and/or markers
  • sticker letters
  • optional: more stickers, glitter, paper scraps, or any other embellishment you can trust your toddler with, plus glue if necessary!
  1. Have your toddler paint or color on the piece of card stock. If you use paint, you will have to factor in drying time. (I used paint & had it be a 2-day project. Twice the fun!)
  2. Have your toddler stick on any other embellishments. I gave Cupcake heart stickers, since this was a Father’s Day card & she ‘hearts’ her daddy. Use holiday themed stickers to be extra festive!
  3. The last step is to give your toddler sticker letters one at a time & in order of whatever word(s) you are trying to get them to spell. I minimally guided Cupcake on putting the DADA stickers next to each other. I suspect that in another month or two, I wouldn’t even have to do that! Then, write your toddler’s name & the date on the back.
  4. Have your toddler give the card to loved ones & watch their heart melt!


My Dream Job

This week I got promoted to my dream job.

When I was a little girl, I wanted to be a marine biologist.

When I got to college, I wanted to be a veterinarian. But eventually I realized what my true passion was.

What I really wanted to be was a stay at home mom.

1499995361979

It’s funny how college – a time where I had no husband or children – helped me see that ultimately I wanted to be a stay at home mom. I came to the realization that no career would fulfill me or give me the sense of purpose that motherhood now does. I’ve sort of written about that before.

I am & will always be a baby/kid person

I am so thrilled I have this opportunity to be home with Cupcake.

Before we got married, my husband & I discussed my SAHM goal. I am beyond blessed to be with someone who also wanted that for his family.  We agreed to start a family soon after the wedding even if that goal wasn’t immediately attainable. Maybe for our second kid, we said.

God made it possible with our first. I’m telling you, it has been like the stars magically aligned for us. I don’t believe in magic or coincidences. I do believe in a great big God.

I am incredibly grateful that I get to make this choice. Not only are we fortunate enough to be able to live off my husband’s income, but we were just as fortunate to have great, affordable childcare. I know families sometimes make the choice for one parent to stay home simply because going to work & paying for childcare isn’t economical. I know other families wish they could make this choice, but they really do need both incomes.

1499864353333

I’m so happy I get to stay home & share silly days with my daughter!

This week started a new chapter for our family. Though I have a few side projects going (like Usborne Books & More), I may not work outside the home again for anywhere from just a couple years to a couple decades. Only time will tell. The only thing I can say with certainty is that I will work harder than I ever have before. According to Salary.com, this job was worth $143,102 & had 31 different job descriptions in 2016.

The job is totally worth it, even without the fat paycheck.

I now have the best boss ever.

1499863925798


Supplies For Pumping At The Office

Going back to work as a nursing mom requires careful planning. You have to figure out a way to leave milk for your baby to eat while you’re away. Cue in the breast pump!

But it’s not just the pump – you need a whole host of supplies, too.

Pumping is just not as intuitive as breastfeeding, so I figured I would try to spell it out as much as possible for other working moms (& future me, in case I forget with the next kid!)

1499433744230

Now, this wouldn’t be a proper parenting post without a bunch of disclaimers: I am not a lactation consultant or a health professional. If any of these tips go against what a doctor is telling you, by all means please listen to the doctor! The views expressed here are my personal opinion. I have a ‘typical 9-5 type’ office job with cubicles & such. These supplies & tips are designed for that type of environment & might not work in other fields of work. I am using a Medela Pump In Style Advanced double electric pump & other Medela products. I am not receiving any compensation for recommending any of the below described products, they are just what I prefer to use. These supplies & tips are what’s currently working for me. If you feel uncomfortable with anything I’m describing, please don’t feel this is the only way. Feel free to leave me a comment & we can discuss!

Pumping at work requires A LOT of supplies. It’s different than pumping at home. For one thing, you can’t just be topless. Here’s what I use at work:

1493400535387

1. Double Electric Pump

This is really the only way to go at work, in my opinion. If you use a single pump it will take you twice as long. With my Medela Pump In Style Advanced, my 2 ‘on the clock’ pumping breaks take less than 20 minutes each: set up, pump for 12 minutes, break down. During my lunch break I usually pump around 20 minutes & get a little more. For me, 10 minutes is my absolute minimum to pump, but 12 is better.

BONUS TIP: Get a spare AC adapter plug. I have seen some tips online that say you should get 2 pumps if you can, one for work & one for home. I can totally see why because setting up and breaking down the pumping station at home & and at work is a pain in the ass. However, getting a spare plug is almost as good as getting another pump. I leave one permanently plugged in at my pumping area at home, and the other one stays permanently in my pumping bag for work (when not in use, of course). That way when I pump at home I just grab the pump out of my bag & the plug is ready & waiting for me on my little stool next to my glider.

2. Hands Free Pumping Bra

I could probably write a whole post just about this bra. I bought one of the Medela hands free bras & used it quite a bit during my maternity leave. When I first started pumping for Cupcake, I’d feed her on one side & pump from the other with this bra. This kind of only worked when she was really young – the older she got the more wiggly she got! Now this bra is a life saver at work. But at first I could NOT wrap my brain around how to use it without taking all my clothes off.

All of the photos you see on the packaging & online are women using them like this:

20170627_090615

So I’m supposed to undress, put on the bra, then put my blazer/sweater back on, & smile? Got it. *eye roll*

I know there are other styles of pumping bras, but I already owned this one. Plus I was afraid of the styles you can wear ‘all day’. Would a breastpad show under it? Would I leak like crazy without a pad? Too much drama.

A friend of mine had her baby 2 months before me & used the same bra, so I asked her how she does it. She said, “I just push everything up.”

So that’s what I did when I returned to work. I’m not about to show you a picture of what it looks like, but here’s my process: I lift my shirt, zip the hands-free bra around my waist, push the bra I’m wearing up, & life the hands-free bra up over my chest.

Some of you might be like, well duh!!! But let me tell you that as a pregnant woman & as a first time mom I could NOT figure that out without someone telling me. So I am telling you just in case 🙂 I have never tried using it with a dress – please let me know if you have!

3. Breastshields with Removable Flanges

Removable flanges are the key here – you cannot use the hands-free bra with the one piece shields.

I do think it is still good to have spare shields, even if they are the one piece kind. I use the one piece shields at home where I can sit back & watch TV, or when I’m only pumping one side. It’s no fun to have to hold 2 of those 3x a day at work.

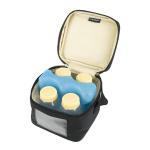
4. Cooler with Ice Pack & Bottles

Medela has these cooler bags with an ice pack that is grooved specifically to hold 4 of the 5oz pumping bottles. I highly suggest getting this, or at least something comparable. The bottles fit snugly & don’t move around much in the cooler.

cooler_bag1_1024x1024

5. Nursing Cover

This is not essential, but the first few days of pumping at work I felt much calmer using a nursing cover. Just in case for some reason anyone burst through the door of my pumping room (no one ever has, thankfully!). It has also come in handy on a few occasions where I have done video chat with my daughter’s caregivers while pumping.

6. Swaddle Blanket

In my opinion, muslin swaddle blankets are the best tool to drape over your lap so you don’t splash milk on your work pants once you’re done pumping. These blankets are way less bulky than a towel, and if you grab one that your baby uses often it might even help you produce more milk by reminding you of/ smelling like your baby.

7. Gallon Storage Bag & 8. Mini Fridge

These 2 go hand-in-hand for me for an important reason: I, personally, do not wash my breastshields at work.

Let me explain. I wash & dry them at home & put them in a gallon storage bag. After I use them for my first pump at work, I put them back into the storage bag & stick it directly in the fridge. Then I just repeat the process the whole day (3 pumping sessions total for me). I do not rinse them – I don’t feel comfortable rinsing them in the communal kitchen & hell no am I going to rinse them in the bathroom. The shields go from a clean bag, to my body, back to the bag, & then to the fridge. Next time I pump, I grab my cooler & my storage bag, pump as normal, & put them away again in the fridge.

My job was kind enough to provide me with a fridge I could keep right at my cubicle. If in the future I have a job that does not do this, I will ask them if I can bring my own. It is really very helpful & most of my coworkers don’t even know I have it.

1499433540044

A mini  fridge is also great for storing breastmilk away from the communal fridge- no worrying about coworkers messing with your cooler in search of a snack! My job was kind enough to provide me with a fridge I could keep right at my cubicle. If in the future I have a job that does not do this, I will ask them if I can bring my own. It is really very helpful & most of my coworkers don’t even know I have it. Of course I also use it to store my personal lunch – if I don’t eat, the baby doesn’t eat!

9. Wipes/Paper Towels

This is for any accidental spills in the pumping area. I have splashed a few drops on the table a couple times & it helps to have something handy to clean up.

10. Headphones

With headphones, you can listen to music, make phone calls, or just keep yourself entertained watching YouTube videos! Pumping can get boring & distracting yourself is important. (Don’t watch the clock! Set a timer on your phone & then do something else!) I keep a pair of headphones in my pumping bag, even though I don’t use them very often.


So there you have my list of supplies for pumping at the office.

It’s hard work, but my little Cupcake is totally worth it ❤

1499436463672

Is your list different? Let me know!

Happy Mother’s Day!

Yesterday was my first Mother’s Day…that I knew about. One year ago today we found out about our sweet little Cupcake.

May 15th will always be a special day for our family.

wpid-1431956326285.jpg

We bought a house in 2015.

1494606662869

We became godparents in 2016.

We actually became godparents on the same day we realized we were parents. That is so special.

Looking at that picture above was what made me take a pregnancy test, actually. Was I just bloated, or could it possibly be…?

1494606588607

I posted this picture on social media as a “one year later” happy homeowner pic. Truthfully, this is the first photo of us as parents. After that first positive pregnancy test. After going to the store to get another one to make sure it wasn’t a fluke.

I wish we could find out about our babies the moment they’re conceived, but we are not that advanced yet. To find out the real exact moment we become parents. Those lines on a home pregnancy test (or 3) will have to do.

wp-1466168566123.jpg

From the moment the strip turned pink I was a different person. A mother.

I was carrying my child. My parents’ and in-laws’ grandchild. My siblings’ & siblings-in-laws’ niece. My friends’ godchild. So loved by everyone well before she came out of my body.

Not a ‘potential’; no longer just a hope & prayer. A real, living human being. 46 chromosomes. Irreplaceable & unrepeatable.

wp-1471653010604.jpg

Today, I’ve been a mom for a whole year.

1494787983177

Why Having A Freezer Stash Of Milk Before Returning To Work Is Important

My maternity leave was 12 weeks long – which isn’t very long at all! I started thinking about it being over even before it started. I knew that I wanted to breastfeed Cupcake for as long as possible & therefore would need to pump milk for her to eat while I was away from her.

BlurImage_5-5-2017-8-53-14

Having a freezer stash before returning to work is important for two reasons: baby needs to eat (duh!), & mama needs peace of mind.

DISCLAIMER: I am not a lactation expert or health professional. The views expressed here are only my personal opinion & what worked for me. Nursing & parenting are not one-size-fits-all, so please do what is best for you & your family!

The first day back to work is stressful enough without having to worry about how your baby is going to eat on your second day back to work. If you have at least a week’s amount of food in the freezer you will feel a lot better. I know I did.

Some of the blogs/articles I read prior to returning to work say that you only really have to have a couple days’ worth of milk in the fridge/freezer before you go back to work. That’s technically true, since you will be pumping at work to replace the milk your baby drinks.

I personally wasn’t totally comfortable with that idea. I just kept thinking my baby would run out of milk or be hungry. Or that pumping wouldn’t work out well. My first day back at work was the first time I was away from my daughter for 10+ hours (8 hours of work, 1 hour of lunch, plus the commute). Sure I had left her with her grandparents a few time while I was on maternity leave, but never for more than like 4-5 hours. They’d ask me how often she eats & when she had to eat next & I would just say, “I don’t know, when she seems hungry just go ahead & feed her 4 oz.”

I wasn’t even totally sure about the 4 oz part – I only said that because I freeze milk in 4oz increments. When she’s with me she eats as much as she wants, whenever she wants, & it’s nearly impossible to tell how much she’s really eating. Only that she’s eating enough.

My first day at work I had no idea how much or how often she’d really eat. Every 3 hours? 4? While I didn’t love the uncertainty, I didn’t see it as a total negative. When I’m with her I 100% nurse on demand & never look to the clock before offering the boob. I wouldn’t have it any other way.

Now that I’ve been back to work for a while, I know that Cupcake usually eats three 4oz bottles while she’s away from me. So 1 week’s worth of milk is 60oz. I had about 80oz of milk in the freezer before I returned to work, which I knew would be enough.

There are lots of ways to go about building a freezer stash, but here’s what worked for me: I pumped at least once a day.

That’s it.

Now, I started pumping when Cupcake was 1 week old due to engorgement issues. Many moms do wait until nursing is well established, 3-4 weeks, before pumping & bottle feeding. My milk came in all at once on day 3. Cupcake actually lost too much weight her first week because I was so engorged she couldn’t latch properly. I met with a lactation nurse & we got pumping and feeding down pat. Thankfully Cupcake did not experience any nipple confusion, considering I started pumping & bottle feeding earlier than most. I’ve been very blessed that our breastfeeding relationship has gone smoothly after those first rocky weeks.

To build my stash, I didn’t try to pump 3-4 times a day or get on any kind of schedule or anything. Once Cupcake was feeding properly, I just made sure I pumped 1-3 ounces a day during my maternity leave. Some days I pumped more than others (whether it was more ounces, or more times), but not with the intention of purposely growing my stash. What I mean is that while I do think it’s important to build a stash, I didn’t stress about it. I built it slowly over my entire leave, only dipping in to it a handful of times before returning to work. Hey, date nights are important!

Having that much breastmilk in the freezer did wonders for my mental health returning back to work. Pumping is very different from nursing, especially when you’re at work. You have to get into a nursing mindset while being far away from your baby & using a loud mechanical device. If you’re too anxious about how many ounces you need to pump, this works against your body & you may pump less. Since I knew this before I returned to work, I tried to set myself up for success by having a nice freezer stash. That way if pumping took a little while to get the hang of, I could still give my baby breastmilk exclusively.

To this day I pump once a day, in the morning, & add that milk to my freezer stash (which now that we are using it to feed Cupcake while I’m at work is no where near 80oz!).

20170501_084630

The hard work of pumping is totally worth it!