Category Archives: Breakfast

Cream Cheese Stuffed Coffeecake with Cinnamon Streusel

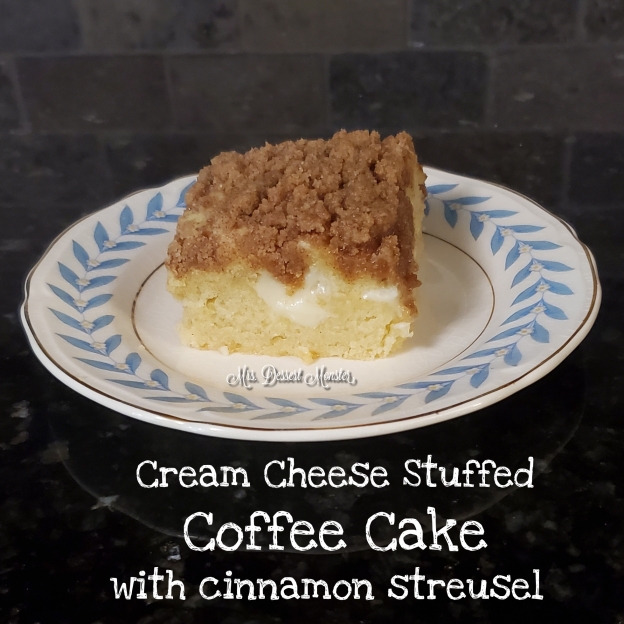
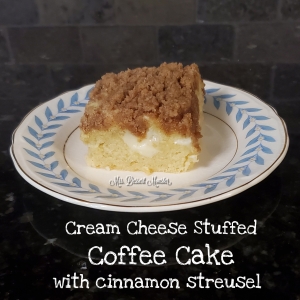
If there’s one recipe I’ve been perfecting during quarantine, it’s coffee cake. Specifically this coffee cake.

cream cheese stuffed coffee cake with cinnamon streusel - Mrs. Dessert Monster

It’s been an adjustment having 3 square meals a day as a family of 4. We are very fortunate that my husband has been working from home & will continue to do so for some time. We’ve really loved all of the extra time we’re spending together as a family – praise the Lord for some of the good that has come out of a terrible situation. However, this has meant he’s home for breakfast & lunch every single day. Before all of this we’d only have breakfast together on the weekends. Cold cereal & breakfast bars get pretty old when we have a lot more time in the mornings. Hence this coffee cake.

cream cheese stuffed coffee cake with cinnamon streusel - Mrs. Dessert Monster

I’ve mentioned before how sweetened cream cheese has become my new thing, & this recipe features it beautifully. The cake part itself is really simple; it’s the filling & the streusel that really make this recipe.

cream cheese stuffed coffee cake with cinnamon streusel - Mrs. Dessert Monster

If you prepare the cream cheese ahead of time, you can be eating warm coffee cake in the morning in about 45 minutes – most of that being bake time.  What I love about this recipe is that it’s perfectly delicious as written, but also totally customizable. Add more spices to the streusel. Use strawberry cream cheese. The sky is the limit.

Cream Cheese Stuffed Coffeecake with Cinnamon Streusel

Makes one 8″ x 8″ coffeecake

For the cake:

  • 1/2 cup oil
  • 1 egg
  • 1/2 tsp vanilla
  • 1/2 cup any milk
  • 1/2 cup sugar
  • 1 1/2 cups flour
  • 1 1/2 tsp baking powder
  • 1/4 tsp salt

For the streusel:

  • 1/2 cup sugar
  • 1/2 cup flour
  • 2 tsp cinnamon (use up to 1 tbsp for more cinnamon flavor)
  • 3 tbsp salted butter, melted

For the filling:

  1. Preheat oven to 350 degrees F. Line an 8″ square pan with parchment paper, leaving two sides overhanging.
  2. First, make the streusel by combining all 4 streusel ingredients in a bowl. Set aside.
  3. To make the cake: combine oil, egg, vanilla, & milk in a large mixing bowl.
  4. In a separate bowl, combine sugar, flour, baking powder, & salt.
  5. Add the dry ingredients to the wet ingredients & mix (by hand or by machine) until combined. Batter will be thick.
  6. Spread half of the batter into the lined square pan. Spread the sweetened cream cheese over the batter & then spread the rest of the batter on top. It is ok if some of the cream cheese is exposed.
  7. Spread the streusel over the batter & bake for 25-30 minutes. The streusel will not change color much, so test after 25 minutes & if a toothpick comes out with just a bit of cream cheese & moist crumbs it’s ready. Cool in the pan for 5-10 minutes before carefully lifting out of the pan using parchment paper.
  8. Enjoy with a fresh cup of coffee, obviously 😉


Sweetened Cream Cheese

Lately I have been on a cream cheese kick. It’s become a new staple in my fridge. In fact, that reminds me I need to add some to my next grocery delivery.

sweetened cream cheese - Mrs. Dessert Monster

This sweetened cream cheese is super easy to put together & has tons of uses. It should last in your fridge the same length of time as the main ingredient: cream cheese.

I have been putting this recipe on & in all kinds of treats. The tangy sweetness is perfect. It goes especially well with my Banana Chocolate Chip Lactation Muffins.

Sweetened Cream Cheese

Makes 8oz
  • 8 oz cream cheese, softened (one block)
  • 1/2 cup (60 grams) powdered sugar
  • 1/2 tsp vanilla extract
  1. Blend all ingredients together in a bowl. I prefer to use an electric mixer to get a super smooth finish, but a regular ol’ spatula works, too.
  2. Store in the refrigerator. Spread on baked goods like muffins & cookies. Use in recipes such as coffee cake & brownies.

Banana Chocolate Chip Lactation Muffins

It has taken me a while, but I have finally come around to sharing recipes on this blog that I make all the time. One of those, in my breastfeeding seasons of life, is this lactation muffin.

Banana Chocolate Chip Lactation Muffins - Mrs. Dessert Monster

This recipe has the big 3 galactagogues: oats, flax, & brewer’s yeast. My issue with other lactation muffin recipes out there is that they try so hard to mask the bitter brewer’s yeast flavor that they barely add any, or add loads of sugar, or sometimes both! This recipe, in my completely biased opinion, is the perfect balance between a sugary,  almost-cupcake & a bitter, too-healthy muffin. It is even vegan if you use vegan chocolate! I have not tried it with whole wheat flour, yet. When I do I will update! Update: whole wheat, white whole wheat, or just plain old all purpose flour all work great!

Banana Chocolate Chip Lactation Muffins - Mrs. Dessert Monster

These muffins are sweet but not too sweet. You can taste that there’s something different about them compared to ‘regular’ banana bread muffins – that’s the brewer’s yeast. If you *really* don’t like the taste, dial it back to 2 tbsp instead of 4 (1/4 cup = 4 tbsp). Flax & brewer’s yeast are very nutritious whether you are breastfeeding or not, so this is a great recipe to share with the whole family.

These muffins freeze very well, just individually wrap them. To thaw, unwrap & microwave for 30 seconds from frozen to enjoy warm. My personal favorite way to enjoy these muffins is with a schmear of sweetened cream cheese.

Banana Chocolate Chip Lactation Muffins

Makes 12 muffins
  • 3 very ripe bananas
  • 1/3 cup coconut oil, melted 
  • 1 tsp vanilla
  • 1/2 cup sugar
  • 1 cup of flour (whole wheat or all-purpose)
  • 1/2 cup of rolled oats
  • 1/4 cup brewer’s yeast
  • 1/4 cup ground flax seed
  • 1 tsp baking soda
  • pinch of salt
  • 3/4 cup chocolate chips (use vegan chips for vegan option)
  1. Preheat oven to 350. Prepare your muffin pan with either liners or baking spray.
  2. Microwave bananas for about 30 seconds so they are ultra mushy.
  3. In the bowl of your stand mixer, add bananas, coconut oil, & vanilla. Mix on medium low until well blended. (It’s ok to see small chunks of coconut oil that have solidified.)
  4. Add sugar and mix on medium until combined.
  5. In a separate bowl, mix flour, baking soda, salt, oats, brewer’s yeast, & flax.
  6. Add the dry mixture to the banana mixture & mix on medium until well combined.  Then add chocolate chips and mix just until the chips are evenly distributed.
  7. Divide the batter into your prepared muffin pan. You should get 12 muffins.
  8. Bake 25-30 minutes or until they pass the toothpick test.
  9. To freeze: completely cool muffins. Wrap each muffin individually in plastic wrap & then place in a plastic container or plastic bag.

Nutritional info: 262 cal, 35.7 g carbs, 11.5 g fat, 4.5 g protein

Pastelitos De Guayaba

In South Florida pretty much all of the grocery stores with a bakery have an assortment of Hispanic pastries/baked goods. Empanadas, arepas, and of course, pastelitos.

Pastelitos are Cuban pastries with various fillings. They can be sweet or savory. Today I’m sharing with you the king of all sweet pastelitos – pastelito de guayaba.

1538055123105.jpg

This pastelito is filled with guava paste, which is a very sweet, very thick guava reduction. It is absolutely one of my favorite things. I’ve briefly shared about it before in a couple of recipes.

In this recipe, guava paste is the star. Pastelitos de guayaba (the Spanish word for guava, as you may have guessed) come in two forms – con queso y sin queso. The combination of guava paste & cheese is truly wonderful. Any cheese will do, but for pastelitos it’s cream cheese. The two flavors melt and marry beautifully in the puff pastry. If cheese isn’t your thing, that’s OK. Just stick with the guava.

Thanks to the wonder that is frozen puff pastry, this recipe is ridiculously simple. I don’t make it often because it’s kind of a calorie bomb, but it’s worth every single one.

1538054810703.jpg

To make a dozen pastelitos, cut the guava paste brick into 12 slices. I usually cut in into quarters & then each quarter into 3 pieces. Then lay the guava slices on to the puff pastry sheet, using the folds as natural dividers. For this batch I put cream cheese on half of them.

1538054917859.jpg

Top with the other sheet of puff pastry, cut into 12 squares that each contain a guava slice, & score the top. Then brush with an egg wash to get that nice golden color.

1538054989741.jpg

These pastries are so flaky and delicious. Cuban people would call this breakfast, but this makes a great dessert, too. Basically good for any occasion, any time of day! Pastelitos are delicious warm or cold, but you definitely want them to cool for a few minutes after coming out of the oven. Hot guava = lava. Hey, that rhymes! These can be a little messy between the flaky crust and warm, gooey guava. You’ll definitely be licking your fingers!

Now that I don’t live in South Florida anymore I might be making these more often. If your local grocery store bakery doesn’t offer pastelitos, now you know how to make your own!

¡Buen provecho!

Pastelitos De Guayaba

Makes 1 dozen pastries

  • 1 package frozen puff pastry
  • 1 brick of guava paste (approx. 14 oz)
  • cream cheese (optional)
  • 1 egg for wash
  1. Preheat oven to 400 degrees F. Thaw the puff pastry according to package directions. You want it thawed enough to unfold without cracking, but not soft.
  2. Unfold one sheet of puff pastry on to a parchment paper lined cookie sheet.
  3. Cut guava paste into 12 slices. Place 4 slices per pastry sheet fold to get your 12 servings. If adding cream cheese, place 1 tbsp (or slice of the same length as guava slice) on top of guava.
  4. Unfold the second puff pastry sheet and place it over the one with the guava paste. Cut into 12 squares and score the tops of each.
  5. Brush egg wash on each square. Bake for 25 minutes or until golden brown. Allow to cool for a few minutes before serving. Can be enjoyed warm or cold.
Nutritional info (with cream cheese): 307 cal, 44 g carbs, 13.5g fat, 4 g protein

Vegan Mini Carrot Muffins

Whole wheat? No refined sugar? Vegan?!?

Don’t worry, I’m not going all ‘crunchy’ on you. I’m just a mama trying to get her toddler to eat veggies.

I think I fed Cupcake too many carrots when she was a baby, because one day around 11 months old she just started rejecting them. She loves peas, but hates carrots. Go figure.

I, on the other hand, love carrots. So I started looking for a way I could get Cupcake to eat them that wasn’t straight up carrot cake. I came across this recipe by Ambitious Kitchen & decided to give it a try. I was going for the vegan option to try & get a little flax in there, but planned on using regular whole milk. I also chose to make mini muffins instead so they’d be a good size for Cupcake. I have a 48-ct mini muffin pan & it’s just the best!

The thing about baking when you have a toddler around is that you are very distracted. Meaning I just straight up forgot to add the milk. Any milk. Which is ironic because the recipe I was following was a sponsored post by Almond Breeze. So I accidentally made them totally vegan, and they were still totally delicious.

Vegan Mini Carrot Muffin - Mrs. Dessert Monster

In my opinion, the carrots are moist enough not to need the milk & the mini size means they’re still a good texture. I don’t think I would try a regular sized muffin like this, though. Also, the OP’s note about these tasting better sitting after in an airtight container overnight is true. They are good straight off of the cooling rack, but they are GREAT after a night in the fridge.

Vegan Mini Carrot Muffin - Mrs. Dessert Monster

Cupcake agrees!

Don’t skimp on the carrots – 1 cup finely shredded! Shredding carrots by hand with a box grater is a pain in the arm (gotcha!) but these are totally worth it. If you are wondering if you need a 3rd carrot to make that cup – you do. I usually use 2 large carrots & then end up shredding a 3rd smaller one.

Full disclosure: I add non-vegan mini chocolate chips to mine. But there are vegan chocolate chips out there, or  you can add another mix in such as nuts, raisins, or coconut flakes.

I told you I wasn’t going ‘crunchy’ on you! 🙂

Vegan Mini Carrot Muffins

Makes 4 dozen mini muffins

  • 1 1/2 cups whole wheat flour
  • 1 tsp baking soda
  • 1/4 tsp salt
  • 1 1/2 tsp cinnamon
  • 1/4 tsp nutmeg
  • 1 cup packed finely shredded carrots (about 2-3 carrots)
  • 1/2 cup pure maple syrup
  • 1 tbsp olive oil
  • 1/3 cup unsweetened applesauce
  • 1 flax egg (1 tbsp flax + 3 tbsp water, mixed)
  • 2 tsp vanilla extract
  • 1/2 cup mix-in of your choice, such as mini chocolate chips, chopped nuts, raisins, or coconut flakes
  1. Preheat oven to 350 degrees F. Grease a mini muffin pan with cooking spray.
  2. Whisk together dry ingredients (first 5) in a medium bowl.
  3. By hand or with an electric mixer set on low, combine carrots, maple syrup, olive oil, applesauce, flax egg, & vanilla.
  4. Add dry ingredients to carrot mixture & stir until you no longer see dry flour. Gently stir in desired mix-in.
  5. Divide batter evenly between muffin cups – less than a tablespoon in each. Bake until they pass the toothpick test, about 12 minutes. Once cool, transfer to airtight container & keep in the fridge. They’re good once cooled, but GREAT after a night in the fridge!

Vegan Mini Carrot Muffin - Mrs. Dessert Monster

Blueberry & White Chocolate Chip Cream Scones

Tomorrow is Mother’s Day & what do all mothers love? Brunch!

That’s what we’re doing at my house, anyway. Brunch with the extended family. And these scones are on the menu!

Blueberry & White Chocolate Chip Cream Scones - Mrs. Dessert Monster

I got this scone recipe from my dear friend Beth, who gives me so many great recipes, who got it from the book Ten Dollar Dinners. However, I have adapted it some. I never have buttermilk powder on hand & have not come across another recipe that calls for it yet. Therefore I just always use lemon juice. I also in general almost always use salted butter for everything, so that’s what I use in this recipe, too. With a few other twists & tweaks, I bring you this recipe.

I’ve never made scones any other way, so this cream method is all I know. I hear it is much easier than another method which requires cutting butter into flour. I make it extra easy on myself by letting my KitchenAid mixer do most of the work. The key is just not to let it over mix.

1526150141356.jpg

Mix on low until it’s just starting to come together.

Blueberry & white chocolate chips has become our favorite flavor combo for scones around here. The white chocolate chips take the scones from “blueberries are healthy, right?” to “oh, this is basically dessert”. But they are too good to pass up for a celebratory brunch. I think that’s why I like to make 24 mini scones out of this recipe instead of 16 larger ones. So I can eat two. (or 5!)


I am very much looking forward to a fun brunch tomorrow morning with our moms &, of course, with my little Cupcake!

IMG_20180512_141427_915.jpg

She enjoyed sampling them this morning 🙂

Blueberry & White Chocolate Chip Cream Scones

Makes 16-24 scones depending on size

  • 2 cups flour, plus more for work surface
  • 1/3 cup sugar
  • 2 tsp baking powder
  • 1/2 tsp baking soda
  • 1/4 tsp salt
  • 1 cup heavy cream, plus 2 tbsp
  • 1 tbsp lemon juice
  • 2 tbsp melted butter
  • 1 tsp vanilla extract
  • 1 cup frozen blueberries
  • 1/4 cup white chocolate chips
  1. Preheat oven to 425 degrees F. Line a rimmed baking sheet with parchment paper & set aside.
  2. Mix the dry ingredients in the bowl of your stand mixer equipped with the paddle attachment.
  3. Whisk the 1 cup of heavy cream, lemon juice, butter, & vanilla in a liquid measuring cup. Pour into the mixer bowl & turn the mixer on low. Mix until the dough is just starting to come together.
  4. Turn out the dough onto a lightly floured work surface & knead for about 1 minute; just until the dough is smooth. Divide the dough into 2-3 equal parts (2 parts = 16 scones, 3 parts = 24 mini scones). Shape & flatten into circles that are about 3/4 inch thick.
  5. Add the blueberries & white chocolate chips to the center of each circle. Fold in the edges to cover completely, then reshape the circle. Cut into 8 wedges & place on the baking sheet. Brush the tops of the scones with the 2 tbsp of cream. Bake for 12 minutes, until lightly browned.


Nursing Mommy’s Chocolate Peanut Butter Shake

Cupcake is 2+ months old & growing like a weed! It’s very satisfying to look at her double chin & chunky legs & know that I did that.

Thankfully breastfeeding is going very well with little intervention from me, but every now & then I’ll drink some Mother’s Milk tea or malta to ‘help’ my supply. I haven’t actually had any supply issues, but eating yummy galactagogues can’t hurt.

What’s a galactagogue, you ask?

Milk

Do galactagogues really work? It’s debatable. I am not a doctor or a lactation expert, so please consult a professional if you are having any issues breastfeeding. The list of foods classified as galactagogues is long & includes lots of healthy & delicious foods. A lot of very common foods are on it, so there’s a good chance any breastfeeding mom is already consuming at least some.

wp-1489159609744.jpg

I’ve also been drinking this shake from time to time. It’s a nice treat between meals. This shake has ground flax seed & puffed wheat, two of the aforementioned galactagogues. Ground flax is not just good for lactation – it’s full of omega 3 & fiber. I’ve been putting it into all sorts of things from drinks to baked goods & even pizza. The shake also has peanut butter for protein & a packet of chocolate Carnation Breakfast Essentials. I’ve made similar shake recipes with cocoa powder instead, but the Carnation stuff is much tastier & full of vitamins. Now, this isn’t exactly a health food. I called it a shake instead of a smoothie for a reason! I used sweetened puffed wheat & regular Carnation stuff, but you can use unsweetened puffed wheat & no-sugar-added Carnation to cut down on the sugar.

wp-1489159402899.jpg

One packet of the breakfast powder makes 2 servings of this shake, so I either share with my husband or blend everything but the ice together & save half in the fridge to blend later.

Is this shake going to help with breastfeeding? I can’t say for sure, but I can tell you it is tasty & fun!

Nursing Mommy’s Chocolate Peanut Butter Shake

Makes 2 servings
  • 2 Tb Peanut Butter
  • 2 Tb Flax Seed
  • 1 cup Puffed Wheat
  • 1 packet Chocolate Carnation Breakfast Essentials
  • 1 cup milk
  • ice
  1. Blend all ingredients except ice together for a few minutes.
  2. Add ice, blend until desired consistency.


Even though I’m posting more intermittently than ever, I was touched to see this:

100 followers

Thank you for all the follows ❤

Monkey Bread Muffins

Every 6 weeks or so it’s my Sunday school’s turn to bring food to church.

Previously I made some yummy granola bars. Last week I made these delicious monkey break muffins.

Monkey Bread Muffins - Mrs. Dessert Monster

This was my first time ever making OR eating monkey bread.

I had never even heard of it before Pinterest. Don’t know if that’s a Cuban-American First Generation problem or some kind of regional thing or what.

Now that I have made it & tried it I am hooked.

These were so simple! I got this recipe from The Frugal Girls.

The secret is refrigerated biscuit dough!

Monkey Bread Muffins - Mrs. Dessert Monster

Cut each biscuit in 6 pieces. Then shake them in cinnamon sugar.

Put 8-10 biscuit pieces in each foil cupcake liner. Foil liners really are the way to go for these. I ran out & used some paper liners to finish the recipe, which I had doubled, & the results were super sticky. I made a little over 3 dozen muffins by doubling the recipe, so i’d say this recipe makes about 20 muffins.

Add raisins, walnuts, whatever else your heart desires! I made a mixture – I like giving people options! I found it best if you put 4-5 biscuit pieces in, then sprinkle in the stuff & top off with more biscuit pieces. This way they raisins/whatever are not just floating on the surface, but nicely mixed in with everything else.

Monkey Bread Muffins - Mrs. Dessert Monster

I differed from the Frugal Girl’s recipe a bit by spooning 1 tablespoon of the brown sugar/butter mix over each muffin.

Monkey Bread Muffins - Mrs. Dessert Monster

The results were glorious.

Buttery, sugary, chewy, soft, crunchy – in other words YUMMY!

These were the talk of the day at church.

Monkey Bread Muffins

Yields approximately 20 muffins

  • 3 tubes refrigerated biscuit dough
  • 1 cup white sugar
  • 2 tsp cinnamon
  • 2 sticks butter
  • 1 cup brown sugar
  • ½ cup chopped walnuts (optional)
  • ½ cup raisins (optional)
  1. Heat Oven to 350 degrees. Put foil liners into muffin tin.
  2. Mix white sugar and cinnamon in a plastic bag. Cut biscuits into 6 pieces. Shake biscuit pieces in the plastic bag until covered in cinnamon sugar.
  3. Place 8-10 biscuit pieces in each foil liner. Add raisins or walnuts, if desired.
  4. In a small sauce pan, melt the butter and brown sugar over medium heat. Boil for 1 minute.
  5. Spoon 1 tablespoon of butter mixture over each muffin.
  6. Bake for 15-17 minutes. Cool & enjoy!
In The New House Designs