Tag Archives: dessert

Classic Cuban Flan

If you thought I was going to let Hispanic Heritage Month pass without posting something, well you might have been right, but I couldn’t let it pass completely without resharing my flan recipe. Last year I started the tradition of making it during HHM. This year it lined up perfectly with our homeschool en español.

I’ve started homeschooling Cupcake for preschool – full immersion Spanish. We are focusing on letter recognition, and with that I’m including tons of vocabulary & culture. Every week we do a new letter, with a review week every 4 weeks. Each week we eat foods that start with that week’s letter. For example, the week we learned the letter F we ate fresas, frijoles, & flan.

Below is my classic flan recipe, made just how my mami taught me. One day I’ll teach my children.

Mrs. Dessert Monster

Deciding what recipe to share with you this week for Hispanic Heritage Month inspired me to make something that I have not made in ages: flan.

classic Cuban flan pressure cooker flanera Mrs. Dessert Monster

What is flan? Flan is a delicious cooked custard. There really is nothing like it in my opinion. It can be very hard to describe. When done correctly, the texture is light and dense at the same time while being totally smooth; truly one of a kind. The caramel on top is just as important as the custard. Flan can be many different flavors. This here is the OG flan.

Every Latin country has their own flan recipe. Actually, it probably even varies family to family! This is my family’s recipe.

classic Cuban flan pressure cooker flanera Mrs. Dessert Monster

I made my family’s classic Cuban flan the old fashioned way – in the pressure cooker.

classic Cuban flan pressure cooker flanera Mrs. Dessert Monster Hisssssssss

We’ve never made it any other way. There are other recipes out there for making it…

View original post 666 more words

Classic Cuban Flan

Deciding what recipe to share with you this week for Hispanic Heritage Month inspired me to make something that I have not made in ages: flan.

classic Cuban flan pressure cooker flanera Mrs. Dessert Monster

What is flan? Flan is a delicious cooked custard. There really is nothing like it in my opinion. It can be very hard to describe. When done correctly, the texture is light and dense at the same time while being totally smooth; truly one of a kind. The caramel on top is just as important as the custard. Flan can be many different flavors. This here is the OG flan.

Every Latin country has their own flan recipe. Actually, it probably even varies family to family! This is my family’s recipe.

classic Cuban flan pressure cooker flanera Mrs. Dessert Monster

I made my family’s classic Cuban flan the old fashioned way – in the pressure cooker.

classic Cuban flan pressure cooker flanera Mrs. Dessert Monster

Hisssssssss

We’ve never made it any other way. There are other recipes out there for making it in the oven. This recipe is staying true to my roots & embracing the scary pressure cooker. There really isn’t anything to be scared of. I bought this one like 10 years ago & it has a sensor that WILL NOT allow you to open it if it’s still pressurized. It’s pretty fail safe. The hissing sound it makes really takes me back to my childhood. I introduced Cupcake to that sound today – she wasn’t a huge fan. Yet.

You CAN make this recipe using an InstaPot, or so I have read. I have zero experience using one, so I’m not sure what the conversion would be. It took me many years to embrace the CrockPot, so I think it’ll be another while before I can embrace the InstaPot.

The other item you need to make this recipe the traditional way is a flanera.

flanera flan Mrs. Dessert Monster

I just bought this one off Amazon (not affiliate link, just sharing!). It’s actually a little sad I didn’t already have one, but I really haven’t made flan in ages! Siglos, as my mom said. The locking lid prevents water from getting in to it. Again, there are other recipes that omit this equipment, even using a pressure cooker or InstaPot. For me, if it ain’t broke don’t fix it. I’m not messing with success & proven results!

This recipe and this cooking method is a part of my heritage. Sure, there are other times I totally embrace different ways of making classic recipes. Or even just outright buy my favorite Cuban foods. No one I know makes their own croquetas anymore, thanks to Goya. But this flan is special. And special equipment aside, it’s pretty simple to make.

classic Cuban flan pressure cooker flanera Mrs. Dessert Monster

Back when I did make this flan more often, I quickly jotted down my mom’s recipe one day. You can totally tell English is my heart language, even though Spanish was my first language. Since it’s been a while I called her to clarify & wrote down the instructions more clearly for all of us.

Classic Cuban Flan

  • 1 14 oz. can sweetened condensed milk
  • ~1 cup milk
  • 5 eggs
  • 1/2 tsp vanilla
  • 1 cup sugar
  1. Pour sweetened condensed milk into a large mixing bowl. Take the now empty can of sweetened condensed milk & fill it with milk (it’s approximately 1 cup, but doing it this way ensures you have equal parts by volume milk & sweetened condensed milk).
  2. Add eggs & vanilla to bowl. Mix thoroughly using electric mixer or by hand with a whisk. Set aside.
  3. To make caramel, pour 1 cup of sugar into medium saucepan. Melt until a light golden liquid caramel forms. Carefully pour caramel into flanera, using oven mitts to turn the flanera to cover the sides with caramel.
  4. Strain the egg custard mix into the flanera with caramel. Close the latches.
  5. Place flanera into pressure cooker. Fill with water until just below lid of flanera (this was less than 2 cups for me, just to give you an idea). Do not fill too high. Close pressure cooker properly. TIP FROM MY MAMI: when using an electric stove top, you may want to use a metal or foil ring to prevent flanera from being in direct contact with the heating element. I have a gas stove so I did not do this step.
  6. Turn the stove on medium heat. When the pressure cooker begins to hiss, cook for 30 more minutes, then turn off heat. Allow pressure cooker to fully depressurize before opening. I usually leave it for about an hour. Take flanera out & put into fridge for 1-4 hours.
  7. When ready to serve, open flanera. Take your serving dish, invert it over flanera & flip flan out. You want a serving dish with some sort of edge so you don’t lose all that precious caramel! Cut into slices & spoon residual caramel over top.
Nutritional info, based on 12 servings: 200 calories, 32 g sugar, 5.8 g protein, 5.1 g fat

Chocolate Mousse

This post is long over due!

wp-1452370126112.jpg

I first mentioned my chocolate mousse in my very first recipe post for homemade ice cream, & recently mentioned it again on my blog-aversary. It’s sort of become a New Year’s tradition, which is great because as delicious as this mousse is, it’s not the healthiest thing out there so I really don’t need to be making it more than once a year. This mousse is great on its own, but it’s also super delicious with fruits like strawberries or grapes.

My job had an end of the year pot-luck, so I doubled the below recipe & brought mousse in individual little cups.

wp-1452370089788.jpg

This mousse is very rich & chocolaty. My mom originally got this recipe from an old cookbook of hers. She taught me her ways & I have tweaked the recipe a little. I’ve actually cut the sugar down – which I think lets the semi sweet chocolate ships stand out a little more.

This recipe is pretty simple & has 2 main steps: 1) melt chocolate & butter together using hot water bath, aka double boiler (or baño de Maria in Spanish), 2) make meringue using an electric mixer.

wp-1452370084657.jpg

Hot water baths are this easy!

For Christmas I made cinnamon gingerbread ice cream (recipe here!), which called for 5 egg yolks. Since I knew I wanted to make mousse for the pot luck, I saved the whites so I wouldn’t have to crack a dozen eggs. It was a win-win!

While the chocolate & butter are melting, the egg whites were getting nice & fluffy & stiff using the kitchenaid. I just turned the mixer speed almost all the way up & let the eggs go for a while until really stiff.

wp-1452370095592.jpg

REALLY stiff!

Then I added the vanilla & slowly added the sugar. Tada, meringue! You can use that recipe by itself to make meringue cookies – just bake them low & slow in the oven. They are so yummy!

By this point the chocolate & butter were all melted & just needed a good stir. Then it was time to fold the chocolaty mixture into the meringue.

wp-1452370103303.jpg

Gently.

wp-1452370107429.jpg

Keep going.

wp-1452370112423.jpg

Almost…

wp-1452370116507.jpg

THERE!

Look at that smooth, chocolaty goodness!

At this point I portioned it out since I was taking it to a potluck, but you you could also set the whole bowl in the fridge to set overnight.

Guys, there’s nothing else like it. This mousse is quite rich. Chocolate lovers will definitely appreciate this dessert.

Since I didn’t get to enjoy this mousse the same night, I saved a little bit of the meringue & made myself a little treat.

wp-1452370129829.jpg

This is one of the best parts of having a gas stove!

wp-1452370133646.jpg

The next day though, I definitely tore into that mousse!

Chocolate Mousse

  • 6 egg whites
  • 3/4 cup sugar
  • 1/2 tsp vanilla
  • 12 oz semi sweet chocolate chips (one bag)
  • 1/2 lb butter (one stick)
  1. Melt chocolate chips & butter in a hot water bath.
  2. Beat egg whites using electric mixer until stiff peaks form. Add vanilla & slowly add sugar.
  3. In a large bowl, gently fold melted chocolate mixture into meringue until smooth & uniform in color. Let it set in the fridge overnight.
  4. Serve on its own, or with fresh fruit.

I made a pregnancy safe (no raw eggs) version of this mousse – recipe here!

Fudgy Cocoa Brownies

A few weekends ago I had the type of Saturday that only comes around once every couple of months. It was a glorious Saturday with absolutely no plans. It was a no-need-for-pants kind of day.

This is not to be confused with the type of Saturday where you are bored & wishing for plans. This was a much needed break from busy lives. My husband & I did things around the house. We watched college football. We had the whole day to ourselves to do whatever we wanted. After a delicious steak dinner, I realized we did not have any dessert. My husband said, “we haven’t left the house all day – do you want to go out for some frozen yogurt?”

I said no.

We hadn’t left the house all day! I was not about to put pants on, especially not after dinner.

So instead, I decided to make some brownies. Then I remembered I had a meeting at church the next day & decided to make a big batch to share.

Fudgy Cocoa Brownies - Mrs. Dessert Monster

I had actually never made brownies from scratch before. I looked up several recipes & tips before arriving at Epicurious’ Best Cocoa Brownies. According to this recipe, these brownies have a soft center & a nice top crust because of butter & granulated sugar. I looked up the differences between cakey & fudgy brownies. This post from Fine Cooking has great explanations. I had no idea there was such a wide variety of brownie techniques, but I think I found my niche with this recipe. I prefer the fudgy kind.

The original Epicurious recipe calls for some fancy & very specific steps.

“Combine the butter, sugar, cocoa, and salt in a medium heatproof bowl and set the bowl in a wide skillet of barely simmering water. Stir from time to time until the butter is melted and the mixture is smooth and hot enough that you want to remove your finger fairly quickly after dipping it in to test. Remove the bowl from the skillet and set aside briefly until the mixture is only warm, not hot.

Stir in the vanilla with a wooden spoon. Add the eggs one at a time, stirring vigorously after each one. When the batter looks thick, shiny, and well blended, add the flour and stir until you cannot see it any longer, then beat vigorously for 40 strokes with the wooden spoon or a rubber spatula.”

Umm, what?

I did no such thing.

I know baking is a science, & I mean no disrespect, but ain’t nobody got time for that.

My brownies still turned out amazing.

I didn’t just throw everything in the bowl, I just kind of used previous baking experience with a little common sense to come up with my own steps. Plus my handy dandy KitchenAid mixer. Also, the Epicurious recipe is for an 8 x 8 pan; I doubled it & used a 13 x 9.

The one instruction I did follow properly was lining the bottom and sides of the baking pan with parchment paper, leaving ‘handles’ on two opposite sides. THAT is great advice.

Fudgy Cocoa Brownies - Mrs. Dessert Monster

The whole thing came out very easily. This is a great idea so you don’t end up cutting the brownies in the pan. I have ruined a few pans by cutting baked goods in them.

Fudgy Cocoa Brownies - Mrs. Dessert Monster

Don’t be like the old me.

These brownies were so amazingly rich & fudgy. Perfect with a glass of milk.

Fudgy Cocoa Brownies - Mrs. Dessert Monster

Walnuts for me, none for my hubby. Compromising can be delicious & fun!

I must make these again.

Fudgy Cocoa Brownies

Adapted from Epicurious Best Cocoa Brownies

  • 2 1/2 sticks unsalted butter
  • 2 1/2 cups sugar
  • 1 1/2 cup unsweetened cocoa powder
  • 1/2 tsp salt
  • 1 tsp vanilla extract
  • 4 large eggs
  • 1 cup all-purpose flour
  • 2/3 cup walnut pieces (optional)
  1. Preheat oven to 325°F. Line the bottom and sides of a 13 x 9 baking pan with parchment paper, leaving an overhang on two opposite sides.
  2. Melt butter. Add melted butter, sugar, cocoa, vanilla, & salt to a bowl & use lowest setting on electric mixer to combine. Add eggs one at a time.
  3. Add flour. Once fully incorporated, mix on medium-high for 30 seconds. Stir in walnuts if desired.
  4. Spread batter evenly in the lined pan. Bake for 20-25 minutes. Brownies should be set in the center, but still moist.
  5. Lift brownies out of pan using parchment paper. Once completely cool, cut into squares.
In The New House Designs

Ricotta Honey Sesame Ice Cream

Last year my husband (then fiance) & I went to Italy with his dad. It was an amazing trip! I had never been to Europe before. We stayed with family in Genoa for most of the trip. They were so warm & welcoming! I’m so glad God worked it out for me to have this new multicultural family on my husband’s side. Towards the end of our trip, we took sidetrip to Venice just the two of us.

Every day, whether in Genoa or Venice, we drank cappuccinos & ate gelato. Every day! It was glorious.

It was in Venice that I had the best gelato ever.

It’s a given that I have a major sweet tooth, but I’m also a chocoholic. I usually gravitate towards treats that have some chocolatey element. This gelato was a different story.

This gelato was ricotta honey sesame.

I think what drew me to this particular flavor was the fact that a couple of days earlier in Genoa, my husband’s aunt served us the most delicious ricotta I’ve ever had. It was so amazingly fresh and creamy. My mouth is watering just typing this. I need to go back to Italy.

So this gelato, ricotta honey sesame, caught my eye.

I am so glad it did! It was my favorite gelato of the entire trip, by far!

I have been dreaming of this flavor ever since.

As soon as we got our ice cream maker, which we bought with a gift card from an Italian friend of the family, I knew I had to attempt an American recreation of the sorely missed gelato.

I googled ricotta honey sesame ice cream to see what I could find, & I wasn’t disappointed by what I found! This Pure Wow recipe for ricotta honey ice cream looked promising. I adapted it for the ice cream maker & added the sesame element.

Ricotta Honey Sesame Ice Cream - Mrs. Dessert Monster

I mixed honey, ricotta, vanilla, cinnamon, & half of the heavy cream with my KitchenAid mixer until it was smooth.

Ricotta Honey Sesame Ice Cream - Mrs. Dessert Monster

While that was all mixing, I crushed up some sesame seed candies (tada!). I grew up eating these; my family calls them ajonjoli (which is the Spanish word for sesame). It seems to be an ‘ethnic’ thing – you can find these in the ethnic food aisle. My husband had never had these before, but my Jamaican coworker had. Island people are all very similar. These candies are really simple – honey & sesame. Perfect for this ice cream!

Once the ricotta honey mixture was smooth, I put it in the ice cream maker with the remaining heavy cream & let it church for about 20 minutes. I was expecting the ice cream to be kind of soft & need to set in the freezer, but I was wrong! I think the ricotta gave it that firm but creamy texture. With the ice cream maker still on, I poured in the crushed up sesame candies to mix them all in.

Ricotta Honey Sesame Ice Cream - Mrs. Dessert Monster

The results were spectacular.

Ricotta Honey Sesame Ice Cream - Mrs. Dessert Monster

Ricotta Honey Sesame Ice Cream - Mrs. Dessert Monster

It’s not quite the exquisite gelato I had in Venice, but it will do until I can go back to Italy for more!

Ricotta Honey Sesame Ice Cream

  • 2 cups heavy cream, divided
  • 1 cup ricotta cheese
  • ½ cup honey
  • 1 tsp vanilla
  • Pinch of cinnamon
  • 6-8 sesame seed candies, crushed.
  1. Using an electric mixer, mix the ricotta, honey, vanilla, cinnamon, & 1 cup of heavy cream until smooth, about 5 minutes.
  2. Pour mixture into ice cream maker & add remaining heavy cream. Churn for 20-25 minutes. Add crushed sesame seed candies before turning off ice cream maker.
  3. Serve & enjoy! If ice cream is too soft, place in freezer to set before serving.
In The New House Designs

Blueberry Cake with Lemon Buttercream

Recently my husband bought these pancake & sausage on a stick things for breakfast, like a breakfast corn dog with pancake instead of cornbread. A blueberry pancake. I took my first bite at my work desk & it was pretty tasty. Then I looked down at my breakfast pancake dog & saw that it was purple. Like, really purple. Marie from Breaking Bad would love these. But then again, who wouldn’t like pretty food?

Somehow this lead to me wanting to make a purple cake for the 4th of July.

I was unamused with my search for a blueberry cake recipe. They all basically said, “toss some blueberries into your cake. Done.” So I sort of came up with my own, using boxed cake mix.

This is becoming my pattern. I like it!

Blueberry Cake with Lemon Buttercream - Mrs. Dessert Monster

I didn’t just want pieces of blueberry in my cake, I wanted my whole cake to be blueberry!

I started by making a blueberry ‘sauce’. I’m really not sure what to call it. It wasn’t really reduced, I just cooked the blueberries with lime juice & sugar to make a liquidy blueberry concoction.

Blueberry Cake with Lemon Buttercream - Mrs. Dessert Monster

Then I strained my concoction to get 1 cup of liquid. I used this to replace a cup of water from the boxed white cake instructions, & saved the solids to be added to the cake batter later.

Blueberry Cake with Lemon Buttercream - Mrs. Dessert Monster

Blueberry Cake with Lemon Buttercream - Mrs. Dessert Monster

Check out that purple!

While the cake was baking, I made lemon buttercream.

It was my first time making it. My mother in law makes delicious buttercream all the time & never uses heavy cream. I took her word for it & got good results using 2% milk. Mmm!

After baking for approximately 30 minutes & cooling, I frosted my colorful cake. I got to taste a little bit of it when I was leveling the cakes to stack them. More mmm!

Blueberry Cake with Lemon Buttercream - Mrs. Dessert Monster

Since this cake was for the 4th of July, I got a little patriotic.

Blueberry Cake with Lemon Buttercream - Mrs. Dessert Monster

I should get bonus patriot points because red & blue mixed together gives you purple.

I was so excited to serve this homemade dessert at our first big shindig at our new house. We had our families & Sunday school friends over for a 4th of July party.

wpid-1436806672460.jpg

This cake was so good, everyone has some even though we were already stuffed to the gills.

The cake & the party were a big success!

Blueberry Cake

  • 1 box white cake mix
  • 3 eggs
  • 1/3 cup vegetable oil
  • 1/4 cup water
  • 18 oz fresh blueberries
  • juice from 1/2 lime
  • 1/2 cup sugar
  1. Remove stems/leaves from blueberries. In a medium saucepan, cook blueberries, lime juice, & sugar for 3-5 minutes. Mash up the blueberries a bit.
  2. Strain the blueberries until you get about 1 cup of liquid. Save the blueberry mash.
  3. With an electric mixer, mix eggs, water, blueberry liquid, oil, & box cake mix on low for 30 seconds. Then mix on medium for 2 minutes.
  4. Pour cake batter into 2 8″ round cake pans. Spoon blueberry mash into cake batter & mix.
  5. Bake for about 30 minutes, until set in the center.

Lemon Buttercream

  • 2 sticks unsalted butter, softened
  • 4 cups confectioner’s sugar, sifted
  • 1 tablespoon lemon extract
  • 3 tablespoons milk
  1. Beat softened butter on medium speed with the paddle beater for about 3 minutes.
  2. Add sifted confectioner’s sugar and stir on low until incorporated.
  3. Add lemon extract and milk. Beat on medium-high for 3 minutes.

CCapture

This is my 50th post! I’m very excited about that. This blog has helped me in ways I could never have anticipated when I started it in January.

In The New House Designs

The Best Banana Pudding Ever

My husband & I took a break from all the unpacking, demo-ing, painting, etc. last week to attend our Chapel Bells end-of-the-season party. It was pot luck style, so of course I signed up for dessert, which was great because I had been looking for an excuse to make the best banana pudding ever.

Banana Pudding - Mrs. Dessert Monster

I got this recipe from my friend Josh. We were in the Pro Life Alliance together in college, & our meetings often involved dessert. The people in the pro-life movement are some of the sweetest I know (no pun intended).

March For Life - Mrs. Dessert Monster

March for Life, January 2012. Washington, DC.

This is one of those recipes that gets better with each step. Sampling along the way is definitely encouraged.

Banana Pudding - Mrs. Dessert Monster

It was like 10PM when I got around to making this the night before the bell party. By 10:30PM I was finished, had sampled it, & gone to bed. It’s a really easy recipe.

Paraphrasing Josh’s instructions: Line a pan with Nilla Waffers. Then in a large bowl mix 2 cups of cold milk (Josh said whole, I used 2% & it still came out good) and 1 and 2/3 packet of instant French vanilla pudding (two full packets is too strong according to Josh) and let sit.

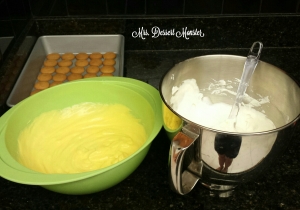
Using an electric mixer – this was my inaugural use of my KitchenAid mixer in the new house! – mix together an 8 oz package of softened cream cheese and a 14 oz can of sweetened condensed milk until smooth.

I think the secret ingredient in this recipe is the sweetened condensed milk. I love it. Cubans use it a lot. My mom & I used to pour it over corn flakes & eat it as a treat. Vietnamese people put it in their iced coffee. It’s magical stuff.

Sweetened condensed milk + cream cheese = YUM! This combo must be explored further..

Once all lumps are gone, fold in a thawed 12 oz container of cool whip. This also results in a delicious combo. I wasn’t kidding about the sampling along the way!

Banana Pudding - Mrs. Dessert Monster
Take the cream cheese mixture and fold that into the pudding. Josh recommends to take a large dollop as a sacrificial amount and whisk it in really well to make sure the pudding isn’t too thick then fold in the rest gently.

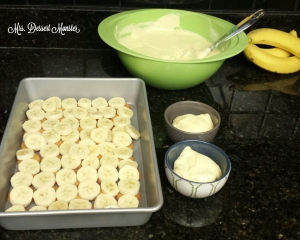
Cut up some bananas & line the baking sheet with the slices. Josh says to use slightly browned ones so they’re kinda soft but still have texture to them, but it’s up to your individual banana preference. I only ended up using 4 bananas in my recipe. You can add more or less!

Banana Pudding - Mrs. Dessert Monster

Those two little bowls are me & my husband’s sample batch 🙂

Pour the pudding mixture over the bananas in the pan immediately to reduce browning. If you are going to serve the same day: top with Nilla wafers & refrigerate for for 2-3 hours before serving. Since I was serving this the next day at the bell party, I didn’t add the top wafers until then. Don’t snack on too many of the wafers, or you might not have enough! This may or may not have happened to me…

Banana Pudding - Mrs. Dessert Monster
The pudding was a hit!

Banana Pudding - Mrs. Dessert Monster

Banana Pudding

  • 4-7 bananas
  • 2 cups cold milk
  • 1 & 2/3 packet Instant French Vanilla pudding
  • 1 8oz package cream cheese, softened
  • 1 14oz can sweeteened condensed milk
  • 1 12oz tub Cool Whip, thawed
  • 1 box Nilla Wafers
  1. Line a 9×13 pan with Nilla Wafers.
  2. Mix pudding & milk together in a bowl.
  3. In a separate bowl, mix cream cheese & condensed milk with an electric mixer until smooth. Fold in Cool Whip.
  4. Take a large dollop of cream cheese mixture & whisk into the pudding. Fold the rest of the cream cheese mixture in gently.
  5. Slice bananas & lay over Nilla Wafers in pan.
  6. Pour pudding mixture over bananas in pan.
  7. Line top of pudding with Nilla Wafers. Refrigerate 2-3 hours before serving, or over night.
In The New House Designs

Easter Bunny Cake

Easter Bunny Cake

Tomorrow is Easter! I’m super excited this year. The Lenten season was very meaningful to me. But more on that later here! 🙂

Today my husband & I took our niece to an Easter egg hunt my coworker put on. It was a lot of fun! Everyone brought a little something to contribute, so of course I brought dessert.

This Easter bunny cake was super easy! Apparently it’s an old Kraft recipe. I used the template below to cut 2 round cakes into the necessary shapes.

kraft bunny cake template

I actually used a 9″ cake for ‘A’ & an 8″ cake for ‘B’ & ‘C’. I liked this a little better than the pictures I saw online because the ears & the bow tie weren’t giant.

I baked my cakes, cut the pieces, & frosted them individually. Then, I assembled them together.

Easter Bunny Cake

I gave him a cute little bunny face & festive bow tie 🙂

Easter Bunny Cake

The kids (and the adults) loved it!

This is a great bunny cake because you can get as fancy or as creative as you want!

Today was a very nice day spent with family & friends.

wpid-img_20150404_172808.jpg

Happy Easter! He is risen, indeed!