Easy Coleslaw Dressing

My almost 6 year old, Cupcake, has become a big coleslaw fan. After several times of googling recipes and then just doing my own thing anyway, I decided to finally write my recipe down.

I add all of the ingredients to a mason jar & use a whisk to combine. Use it as you would any other coleslaw dressing.

Easy Coleslaw Dressing

Enough for a heavily dressed 8oz bag, or a lightly dressed 16oz bag of coleslaw

  • 3/4 cup (180g) mayo
  • 2 tbsp apple cider vinegar
  • 1 tbsp stone ground mustard (or Dijon)
  • 3 tbsp sugar
  • 1/4 tsp salt
  • pepper to taste
  1. Add all of the ingredients to a jar or bowl. Use a whisk to combine. Keep refrigerated; will last several days.

Revamped Pizza Dough

Oh hello there. Idk exactly what happened in 2021, but I guess I took a year off from this online space. Anyway, today while I was making the dough for our homemade pizza, I figured I should write out the recipe the way I’ve *actually* been making it for the past several years & not the way I wrote about back in 2016 (oh my goodness, HOW long ago?!?!)

Oh, and by the way, I’m very pregnant with baby #3.

Cupcake is 5, Blueberry is 2.5, & Olive will make his outside appearance in March.

No time like the end of my third trimester to be sharing a recipe, right?

My Usual Pizza Dough

Makes two large-ish pizzas

  • 1 cup (120g) whole wheat flour
  • 1 1/2 cups (180g) bread flour (can sub all purpose, dough won’t be as stretchy)
  • 1 tbsp yeast (if using active dry, you can activate it in a bit of warm water first)
  • 1 cup water
  • 1 tsp salt
  • 1/8 cup olive oil + more for oiling a large bowl
  1. Add all of the ingredients except the water to the bowl of your stand mixer, keeping the yeast and the salt separated.
  2. Add 3/4 of the water & using your dough hook, stir together ingredients until a cohesive ball of dough is formed. Add more water slowly if the dough ball seems dry or there is still visible flour in the bowl. You may not need all of the water depending on the humidity that day.
  3. Knead the dough with the stand mixer for about 5 minutes.
  4. Place dough in a large oiled bowl & cover with a towel. Allow dough to rise for 45 minutes to an hour, until dough doubles in size.
  5. Punch down the dough & divide in half. Roll out or hand stretch the portion(s) you want to use.
  6. Freeze an unused dough ball for up to 3 months. Let frozen dough thaw for 8-12 hours & let rise before rolling out & using.

Pumpkin Pie Cookies

I have a new favorite fall dessert, y’all.

Normally I don’t think ‘cookies’ when I’m thinking about fall and Thanksgiving, but I was looking for an easy dessert to bring to a small church fellowship. I wanted to make something pumpkin, but cutting into a whole pumpkin pie outside & dishing it out just didn’t sound fun. Plus I was trying to stay away from “communal” dishes, with these unprecedented times and what not (if I had a nickel…). Luckily I came across a great recipe & in my usual fashion I tweaked it to my liking.

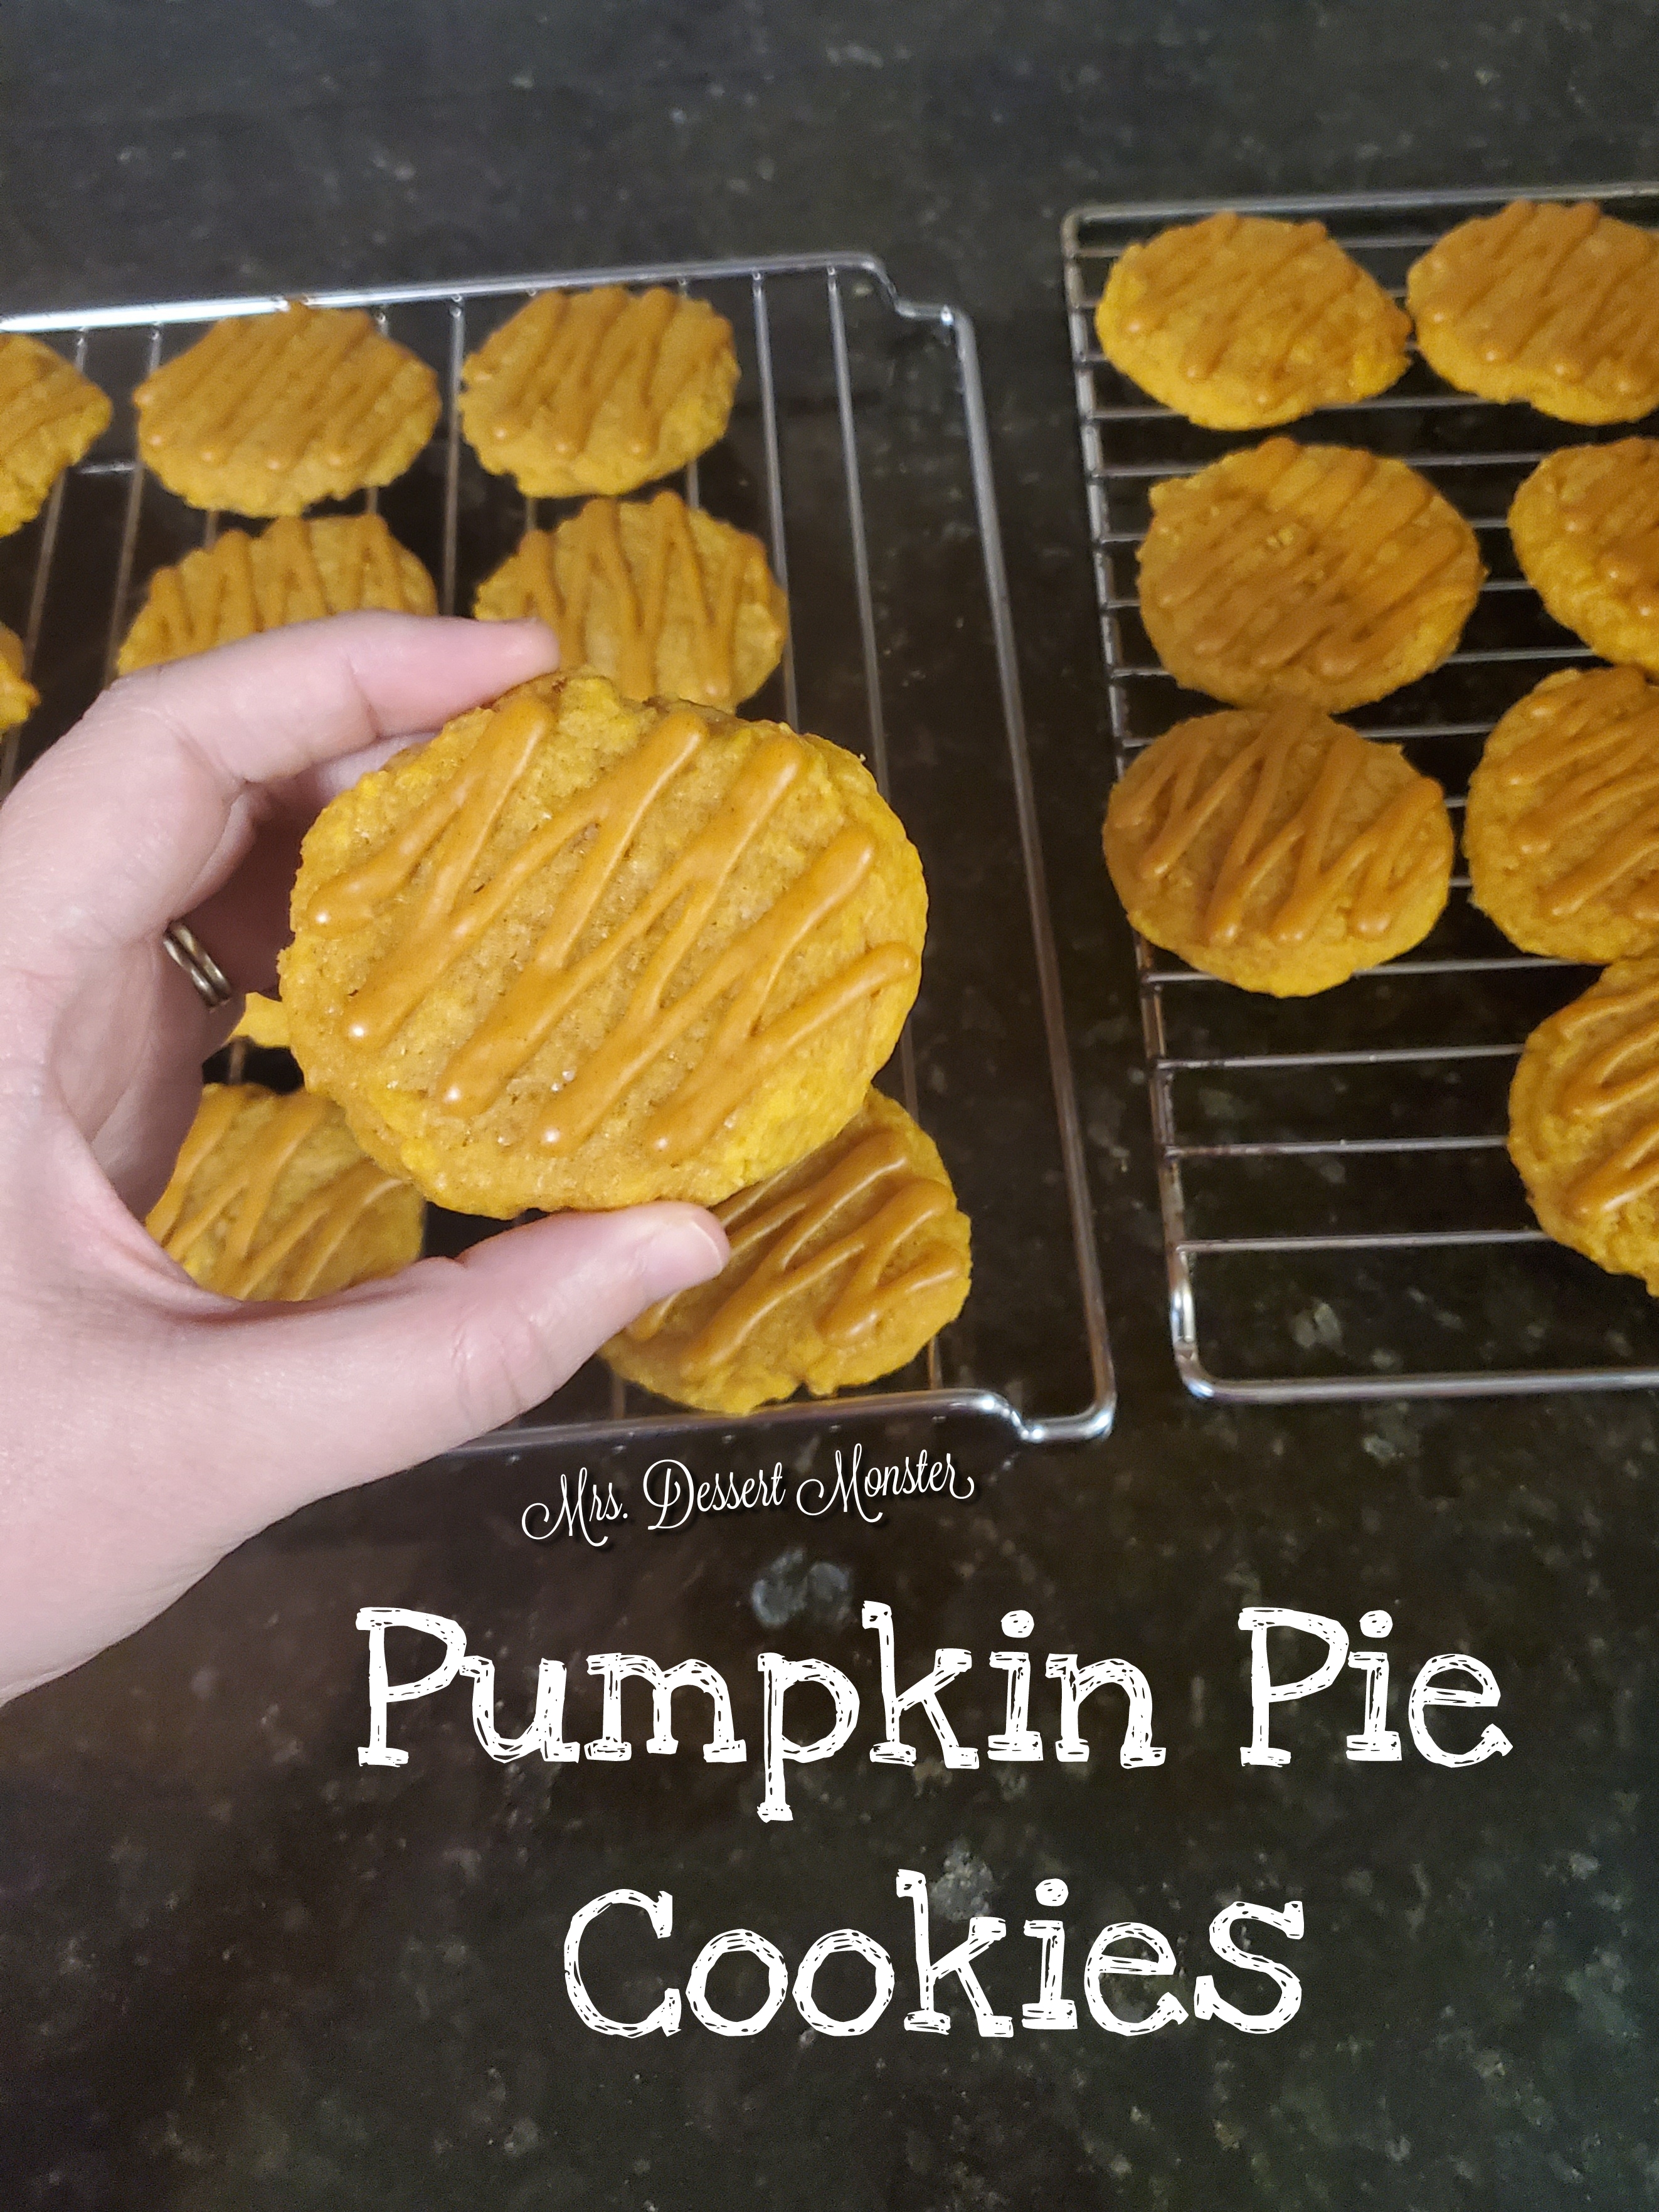
These soft, tender cookies really do taste like a pumpkin pie. You can really taste that subtle pumpkin flavor. I also love the natural color that the pumpkin puree and spices give to them.

I had to stop myself from eating too many before taking them to our fellowship! I may need to make another batch or two for Thanksgiving.

Pumpkin Pie Cookies

Makes approximately 30 cookies. Adapted from Kimspireddiy

For cookies:

  • 1 ¾ sticks softened butter
  • 1 ½ cups sugar (300g)
  • 1 egg yolk
  • ½ cup pumpkin puree
  • 2 tsp vanilla
  • 2 ½ cups flour (300g)
  • ½ tsp baking powder
  • 1 heaping tsp cinnamon
  • pinch each of cloves, ginger, & nutmeg
  • pinch of salt (up to ½ tsp if using unsalted butter)

For glaze:

  • 1 cup powdered sugar (120g)
  • 1 tbsp pumpkin puree
  • ½ tsp cinnamon
  • 1-2 tsp water

1. Preheat oven to 350 degrees. Cream together butter and sugar in mixing bowl.
2. Add egg yolk, pumpkin puree, & vanilla.
4. In a separate bowl, combine flour, baking powder, salt, and spices.
5. Add the dry ingredients to the wet ingredients & mix until combined.
6. Use a cookie scoop or tablespoon to drop balls of dough on a cookie sheet lined with parchment paper or silicone mat.
7. Use your clean fingers to gently pat down cookie dough into uniform discs.
8. Bake 10-12 minutes. Cool for about 15 minutes on cookie sheet and then allow them to cool completely before glazing; cookies will be soft.
9. To make the glaze: Whisk together 1 cup of powdered sugar, 1 tbsp pumpkin puree, ½ tsp cinnamon, and 1-2 tsp of water. Drizzle over cookies by using a ziplock bag & cutting a tiny hole in one corner. Glaze will harden & set.

Classic Cuban Flan

If you thought I was going to let Hispanic Heritage Month pass without posting something, well you might have been right, but I couldn’t let it pass completely without resharing my flan recipe. Last year I started the tradition of making it during HHM. This year it lined up perfectly with our homeschool en español.

I’ve started homeschooling Cupcake for preschool – full immersion Spanish. We are focusing on letter recognition, and with that I’m including tons of vocabulary & culture. Every week we do a new letter, with a review week every 4 weeks. Each week we eat foods that start with that week’s letter. For example, the week we learned the letter F we ate fresas, frijoles, & flan.

Below is my classic flan recipe, made just how my mami taught me. One day I’ll teach my children.

Mrs. Dessert Monster

Deciding what recipe to share with you this week for Hispanic Heritage Month inspired me to make something that I have not made in ages: flan.

classic Cuban flan pressure cooker flanera Mrs. Dessert Monster

What is flan? Flan is a delicious cooked custard. There really is nothing like it in my opinion. It can be very hard to describe. When done correctly, the texture is light and dense at the same time while being totally smooth; truly one of a kind. The caramel on top is just as important as the custard. Flan can be many different flavors. This here is the OG flan.

Every Latin country has their own flan recipe. Actually, it probably even varies family to family! This is my family’s recipe.

classic Cuban flan pressure cooker flanera Mrs. Dessert Monster

I made my family’s classic Cuban flan the old fashioned way – in the pressure cooker.

classic Cuban flan pressure cooker flanera Mrs. Dessert Monster Hisssssssss

We’ve never made it any other way. There are other recipes out there for making it…

View original post 666 more words

Cream Cheese Stuffed Coffeecake with Cinnamon Streusel

If there’s one recipe I’ve been perfecting during quarantine, it’s coffee cake. Specifically this coffee cake.

cream cheese stuffed coffee cake with cinnamon streusel - Mrs. Dessert Monster

It’s been an adjustment having 3 square meals a day as a family of 4. We are very fortunate that my husband has been working from home & will continue to do so for some time. We’ve really loved all of the extra time we’re spending together as a family – praise the Lord for some of the good that has come out of a terrible situation. However, this has meant he’s home for breakfast & lunch every single day. Before all of this we’d only have breakfast together on the weekends. Cold cereal & breakfast bars get pretty old when we have a lot more time in the mornings. Hence this coffee cake.

cream cheese stuffed coffee cake with cinnamon streusel - Mrs. Dessert Monster

I’ve mentioned before how sweetened cream cheese has become my new thing, & this recipe features it beautifully. The cake part itself is really simple; it’s the filling & the streusel that really make this recipe.

cream cheese stuffed coffee cake with cinnamon streusel - Mrs. Dessert Monster

If you prepare the cream cheese ahead of time, you can be eating warm coffee cake in the morning in about 45 minutes – most of that being bake time.  What I love about this recipe is that it’s perfectly delicious as written, but also totally customizable. Add more spices to the streusel. Use strawberry cream cheese. The sky is the limit.

Cream Cheese Stuffed Coffeecake with Cinnamon Streusel

Makes one 8″ x 8″ coffeecake

For the cake:

  • 1/2 cup oil
  • 1 egg
  • 1/2 tsp vanilla
  • 1/2 cup any milk
  • 1/2 cup sugar
  • 1 1/2 cups flour
  • 1 1/2 tsp baking powder
  • 1/4 tsp salt

For the streusel:

  • 1/2 cup sugar
  • 1/2 cup flour
  • 2 tsp cinnamon (use up to 1 tbsp for more cinnamon flavor)
  • 3 tbsp salted butter, melted

For the filling:

  1. Preheat oven to 350 degrees F. Line an 8″ square pan with parchment paper, leaving two sides overhanging.
  2. First, make the streusel by combining all 4 streusel ingredients in a bowl. Set aside.
  3. To make the cake: combine oil, egg, vanilla, & milk in a large mixing bowl.
  4. In a separate bowl, combine sugar, flour, baking powder, & salt.
  5. Add the dry ingredients to the wet ingredients & mix (by hand or by machine) until combined. Batter will be thick.
  6. Spread half of the batter into the lined square pan. Spread the sweetened cream cheese over the batter & then spread the rest of the batter on top. It is ok if some of the cream cheese is exposed.
  7. Spread the streusel over the batter & bake for 25-30 minutes. The streusel will not change color much, so test after 25 minutes & if a toothpick comes out with just a bit of cream cheese & moist crumbs it’s ready. Cool in the pan for 5-10 minutes before carefully lifting out of the pan using parchment paper.
  8. Enjoy with a fresh cup of coffee, obviously 😉


Sweetened Cream Cheese

Lately I have been on a cream cheese kick. It’s become a new staple in my fridge. In fact, that reminds me I need to add some to my next grocery delivery.

sweetened cream cheese - Mrs. Dessert Monster

This sweetened cream cheese is super easy to put together & has tons of uses. It should last in your fridge the same length of time as the main ingredient: cream cheese.

I have been putting this recipe on & in all kinds of treats. The tangy sweetness is perfect. It goes especially well with my Banana Chocolate Chip Lactation Muffins.

Sweetened Cream Cheese

Makes 8oz
  • 8 oz cream cheese, softened (one block)
  • 1/2 cup (60 grams) powdered sugar
  • 1/2 tsp vanilla extract
  1. Blend all ingredients together in a bowl. I prefer to use an electric mixer to get a super smooth finish, but a regular ol’ spatula works, too.
  2. Store in the refrigerator. Spread on baked goods like muffins & cookies. Use in recipes such as coffee cake & brownies.

Anthony’s Famous 1,000 Island Salad

Pulled out an old favorite for dinner tonight! It’s actually healthier than I made it seem in my original post. If you stick to 4 tbsp of dressing, each serving is about 450 calories with 15g of protein & 3-4 grams of fiber!

Mrs. Dessert Monster

I’m 15 weeks along with my little baby & finally feeling more energetic! Blogging will probably be more sporadic going forward – I don’t foresee myself blogging a ton with a newborn next year! But writing & sharing recipes is really important to me.


 My husband introduced me to a wonderful salad combination. So wonderful that whenever one of us says, “Do you want salad for dinner?”, this is the one we are talking about.

wp-1469889710562.jpg

As far as salads go, this one isn’t very fancy. But all the flavors work together beautifully. Tangy olives, crispy bacon, sharp red onion, & buttery croutons! Throw in some shredded cheese & top it off with 1,000 island dressing – that’ it. That’s the recipe. Well, with lettuce, of course.

wp-1469889722041.jpg

We used pre-bagged salad mixes, usually ones with carrots for extra vegetables. We always make our own croutons – toast some sliced bread with butter…

View original post 174 more words

Hand & Footprint Canvas Craft

Happy Mother’s Day!

This year for our moms, I decided to do a hand made craft with the kids. If you’ve seen my kid crafts before, you know I usually like them to be as adult hands-off as possible. This one is a little different. I saw this awesome idea on Fabulessly Frugal & immediately wanted to do something similar for our moms.

Hand & Footprint Canvas Craft - Mrs. Dessert Monster

This is a simple, but multi-step (multi-day for me) project. Cupcake is 3 years old & loves painting. I had her paint two canvases; one 8×10 & one 9×11 just to mix it up. She needed a little bit of assistance to cover the entire canvas with paint without leaving white areas or muddling the colors too much. Once that was done, we let the paint dry over night. The next day, we did Cupcake’s hand print as the ‘O’ in LOVE. To be safe & reduce the chance of smudging, we let that dry overnight, too. On a different day, we did Blue’s footprints as the ‘V’. He was 7 months old at a time & it was more difficult than I was expecting! If your child is older, this could be a one day project. Once those dried (I think I did it the same day this time), I painted the ‘L’ & ‘E’. I also painted the edges of the canvas black to make it look more finished. Finally, when everything was dry dry dry, I wrote their names & ages on the back & they were ready to be gifted for Mother’s Day!

Hand & Footprint Canvas Craft - Mrs. Dessert Monster paint

I mailed one to my mom in Florida, & the other we gave to my mother in law Mother’s Day weekend. I love that this is a kid’s craft that also makes for adorable decor. I know the kids will be excited to go to their grandmas’ houses & see their art on the walls. Cupcake will be, anyhow. Blue is still excited about anything & everything, since he is an infant!

Hand & Footprint Canvas Craft

  • canvas, 8×10 or larger (the larger the easier it is to work with)
  • paint, such as acrylic, in as many colors as you’d like plus black
  • paint brushes
  • clean-up supplies such as wipes/towels – especially if there’s a baby involved!
  1. Paint your entire canvas using as many colors as you’d like.
  2. Once your painted canvas is dry, get black paint on your child’s hand. Press their hand on the canvas where the letter O would be in the word LOVE.
  3. Once the hand print is reasonably dry (or totally dry if you are working with toddlers & babies), get black paint on your child’s feet one at a time & press on canvas to form the letter V.
  4. Once the V is reasonably dry, use a brush to paint on the letters L & E. If desired, paint the edges of the canvas black.
  5. Finally, once everything is completely dry, write the child’s name or have them sign the back. Your beautiful art gift is ready!

Cheeseburger Lasagna Rolls

Apparently when I make lasagna, I always have 4 noodles left. I made these for dinner last night after staring at this mostly empty box of lasagna noodles taking up space in my pantry. Subbed jalapeños for pickles – it was awesome!

Mrs. Dessert Monster

Everyone has to play ‘Pantry Roulette’ with dinner every now and then. Whether it’s a budget thing, an expiration date thing, or a grocery shopping thing. This recipe was born from the last.

We needed something for dinner, but I would not be able to go grocery shopping for a few more days. I didn’t want to just serve grilled cheese sandwiches – I wanted something with at least some semblance of vegetables! So I put my thinking cap on to see what I could come up with.

The only green thing I had in the fridge was pickles. I know pickles don’t really count as a vegetable, but I decided to roll with it (no pun intended!). I also had half a block of cream cheese I needed to use up. And then I remembered that in the pantry I had a few lasagna noodles left. Hmm…

I wrote…

View original post 581 more words

Blueberry & White Chocolate Chip Cream Scones

Do you find that you go through baking “seasons” where you make something often & then just kind of…forget about it? That’s how I feel about these scones. I made these this morning for the first time in almost 2 years – almost since I originally posted it! Since it seems like the world is still currently baking all the things, I figured this recipe was worth a re-post.

Mrs. Dessert Monster

Tomorrow is Mother’s Day & what do all mothers love? Brunch!

That’s what we’re doing at my house, anyway. Brunch with the extended family. And these scones are on the menu!

Blueberry & White Chocolate Chip Cream Scones - Mrs. Dessert Monster

I got this scone recipe from my dear friend Beth, who gives me so many great recipes, who got it from the book Ten Dollar Dinners. However, I have adapted it some. I never have buttermilk powder on hand & have not come across another recipe that calls for it yet. Therefore I just always use lemon juice. I also in general almost always use salted butter for everything, so that’s what I use in this recipe, too. With a few other twists & tweaks, I bring you this recipe.

I’ve never made scones any other way, so this cream method is all I know. I hear it is much easier than another method which requires cutting butter…

View original post 377 more words